


Avg Duration: 10 Mins
Difficulty: Beginner
Blogs Setup: 5000+
Pst: You can skip the intro and get started here.
Dear Bloggers…
If you want to create a WordPress blog quickly and professionally and learn several tips & tricks for WordPress while you’re at it, welcome! — It’s the ideal place to get started!
I’ve written about how to start a blog on blogs like Huff Post, USA Today, ProBlogger, and more but this blog is our main headquarters for sharing the best blogging tips directly with you.
I made this quick 10min how to start a blog guide because I know you’re out there looking for a simple way to get started but there’s also a ton of junk online. Well I was in your shoes in the Fall of 2010 when I began so I want you to know you’re not alone.
Now, blogging is the most rewarding thing on the planet. You can work+travel literally anywhere, meet other bloggers, and actually get credit for your writing (as opposed to writing reports for your boss or essays for college that go nowhere!)
And after 6 years of pain & gain out here, I’m here (as is our AMAZING community) to show you how to blog too.
To date this guide has helped over 3000 new blogger make a WordPress blog for 2019 in every niche from cooking, fashion, tech, wellness, pet-care, create a WordPress blog. Proud face. But what’s important is that you actually setup a blog today!
You can build a blog whether you’re 5, 25 or 75, and like everything we do this is all made easier for beginners. So, without further ado, let’s jump right in and create your blog!
How To Pick the Best Blog Platform in 2019

You probably landed on this guide to create a WordPress blog in the first place, but if you weren’t sold yet…
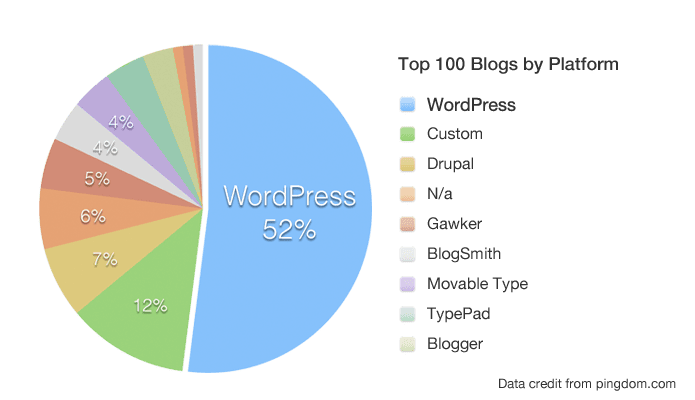
Every year we review the top 50 blog platforms. While we love all the cute blog platforms out there, there’s always an overwhelming winner: WordPress! (the .org version)
WordPress.COM charges for ads, traffic and plugins and we almost all out grow it.
However WordPress.ORG has the biggest community, the most FREE themes and plugins, and you don’t need any coding to create a WordPress.org blog or run a blog on WordPress. Best of all, it is free once you get a domain and hosting (steps shown below).

Other reasons why WordPress powers over 35% of the Web’s top 10 million websites including Mashable, Forbes, Beyonce, PinchofYum, Zoella, TechCrunch and more:
- WordPress let’s YOU become a publisher: Average writers like myself who were once turned down by big media publications have learned how create our own publishing empires here on WordPress, and you can too 🙂
- WordPress is the #1 software to make a living online: From blogging to affiliate marketing, paid ads to web dev, coaching to eBooks, ghost writing to sponsored posts, the opportunities are everywhere on WordPress.
- WordPress.org lets you pick your own domain name: Which is crucial to brand recognition, while WordPress dot com uses domains with the wordpress dot com extension (so for example this site would be dearblogger(dot)wordpress(dot)com, instead of dearblogger.org). The same goes for Tumblr, Blogger and more.
- Community, community, community: You can find like-minded bloggers anywhere online. However if you want to be take seriously by the majority of pro-bloggers, setting up a WordPress.org site is the basic entry ticket.
- WordPress has free tools to rank in Google on the front page without being an SEO expert: You can write viral content day after day by deploying the same methods bloggers have been using for years.
So whether you want to start from scratch, or learn how to migrate WordPress com to WordPress org, you’ll be in good company!
It’s your best chance at success from every angle – ranking in Google, professional designs, making money blogging, you name it.
Now that we know why WordPress has become so popular, let’s address a highly common yet mis-explained question…
What Does “Self-Hosted” Mean?
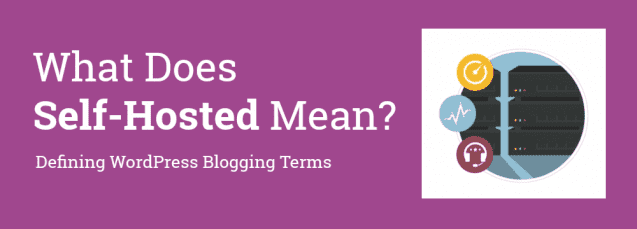

I always wondered why they called it “self hosted” and what that meant.
Do I have to connect the toaster to the TV just to login? It’s honestly a poorly-made term that confuses almost everyone!
However, I came to love hearing the words “self hosted.” For you to love it too we need to define self hosted WordPress.
Dear Blogger please define Self Hosting, it MEANS…you basically pay a tiny amount for some space you control online. As I now know, having your own self-hosting makes you all powerful as your own web designer.
Self Hosting Does NOT MEAN…Complicated techie setup: You don’t need to do any work like server maintenance or even know that stuff. As you’ll see below you just login to WordPress each morning and blog.
Okay, now that we’ve covered the definition of self hosted WordPress, it hopefully shouldn’t feel quite as scary. So what do you need to create a WordPress blog?
What You Need to Create a WordPress Blog 2019
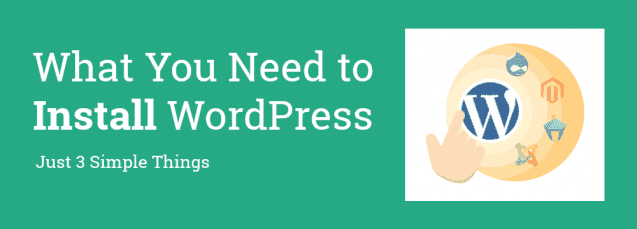
You only need three things to create a WordPress blog and complete this tutorial:
- A domain name (the address aka name of your blog or website, like “dearblogger.org” or “yourname .com”)
- Some basic web hosting (the plot of land where your blog lives, every blog has to be hosted somewhere). It certainly helps if your web host has 1-Click WP Installations, which our pick today (HostGator) obviously does.
- Your attention for just 10 minutes. That’s it!
That’s right, in less time than it takes to watch an episode of Seinfeld on television you can have your own professional WordPress.org blog live, and I’ll walk you through the whole process from start to finish.
This tutorial will cover:
- How to Register a Domain Name for only $5.99
- How to Choose the Best Web Hosting on a Budget
- How to Install WordPress in 1 Click
- How to Choose Your Theme
- How to Publish Your First Blog Post
- How to Super-Charge WordPress with Plugins
- How to Add a Coming Soon Page
- How to Setup Google Analytics and Index Your Blog to Rank in Google
- How to Make Money Blogging
- Further Resources to Help You Learn How The Pros Blog and Master WordPress
Okay, are you ready yet? Let’s get started!
Video WordPress Tutorial for 2019 – Create a WordPress Blog on YouTube
Please note that you can learn every step on how to build a WordPress blog here in this video below. Plus you get to see me all nervous in front of the camera so, why not:

If the video isn’t for you or if you need more help, please keep reading for full written instructions with screenshots of each step.

Step 1. Domain Name & Hosting Setup (and Prices Explained)
Note 1: If you get stuck or confused at any point in this tutorial, please ask for help. You can shoot me an email or find me on Twitter or Facebook. No blogger goes without an answer around here.
So we’ve covered the only two things you need – domain & hosting – to create a WordPress blog. What’s the cost though?
Domain names aka domains typically cost consumers $15/yr, while hosting can range from $10/mo up to $100/mo!
That’s a wee bit steep, especially if you’e just starting your website and want to find success on a budget.
Thankfully, we’ve partnered with HostGator to offer DearBlogger readers a domain name for only $5.99 along with 62% off hosting.
I’ve hosted all our blogs and client sites at HostGator since day 1 and love them like family. They offer so much for free once you get hosting so you can look like a professional boss, and can help solve anything, anytime. While there are many good web hosts, I’m confident you’ll enjoy HostGator too.
Disclosure: We receive a commission from HostGator at no additional cost to you if you click through the links on this page and sign up. In fact the cost to you will be less because of the deals we can offer thru HostGator. We review lots of web hosts and only pick the best web host for each guide. Thanks, your support helps us keep providing free advice!
A WordPress.org blog and a WordPress website are the same exact thing when you start out! As we’ll see below, either way you simply install the latest version of WordPress.org, then your theme dictates whether you have a blog or website feel.
So rest-assured, by the time you’re done here, you’ll have your own self hosted WordPress blog up for all your friends and family to see. AND we’ve got you covered on how to make it look professional.
Let’s get started by purchasing your domain and hosting.
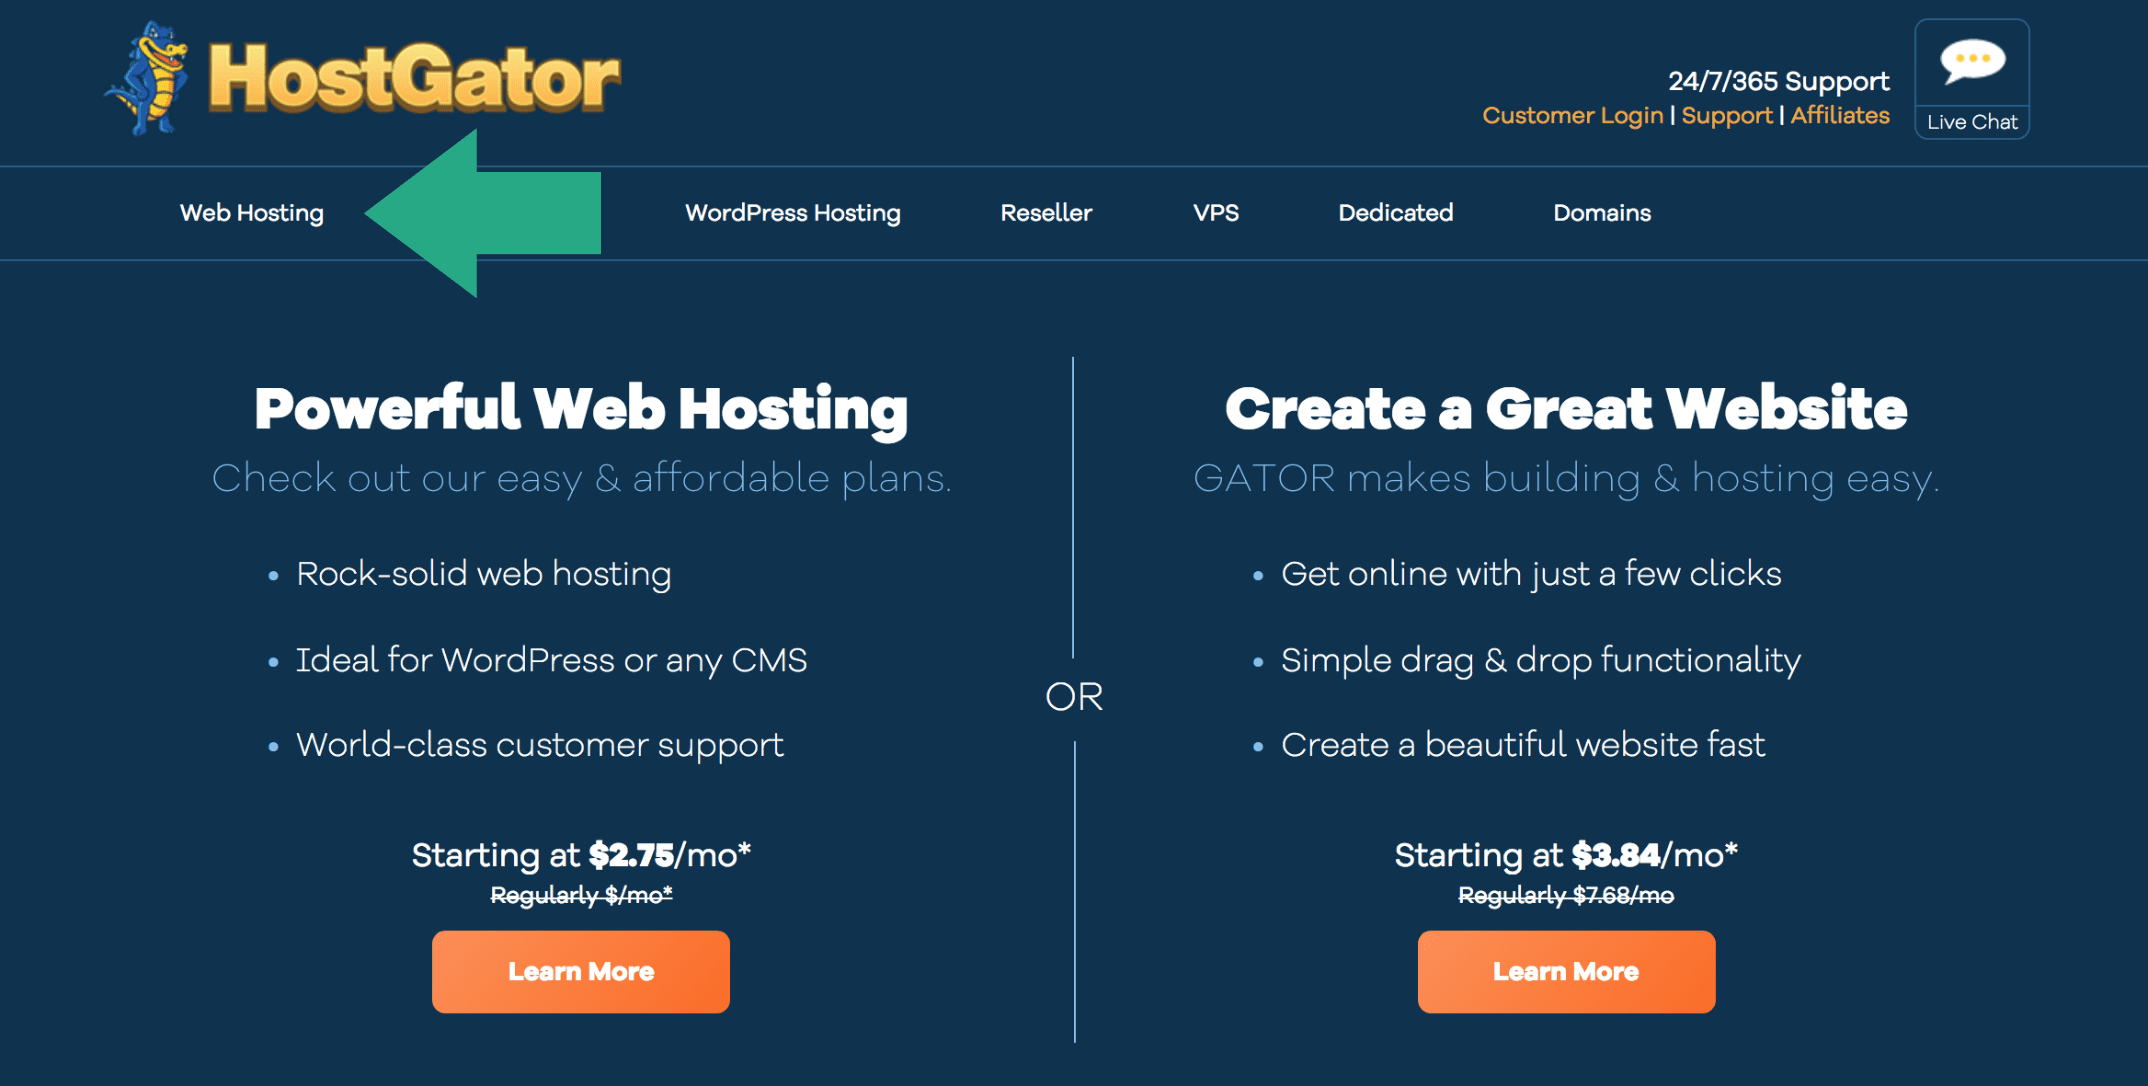
Open up HostGator in a new browser window – I’ve screenshotted every step to get you affordable yet quality web hosting below.
The first step is simple, just click Web Hosting in the upper left.

On the next screen, select the plan you need (Hatchling and Baby are the most popular). Hatchling is has all the great features for one website. Baby has everything Hatchling has, but also lets you host multiple domain names.
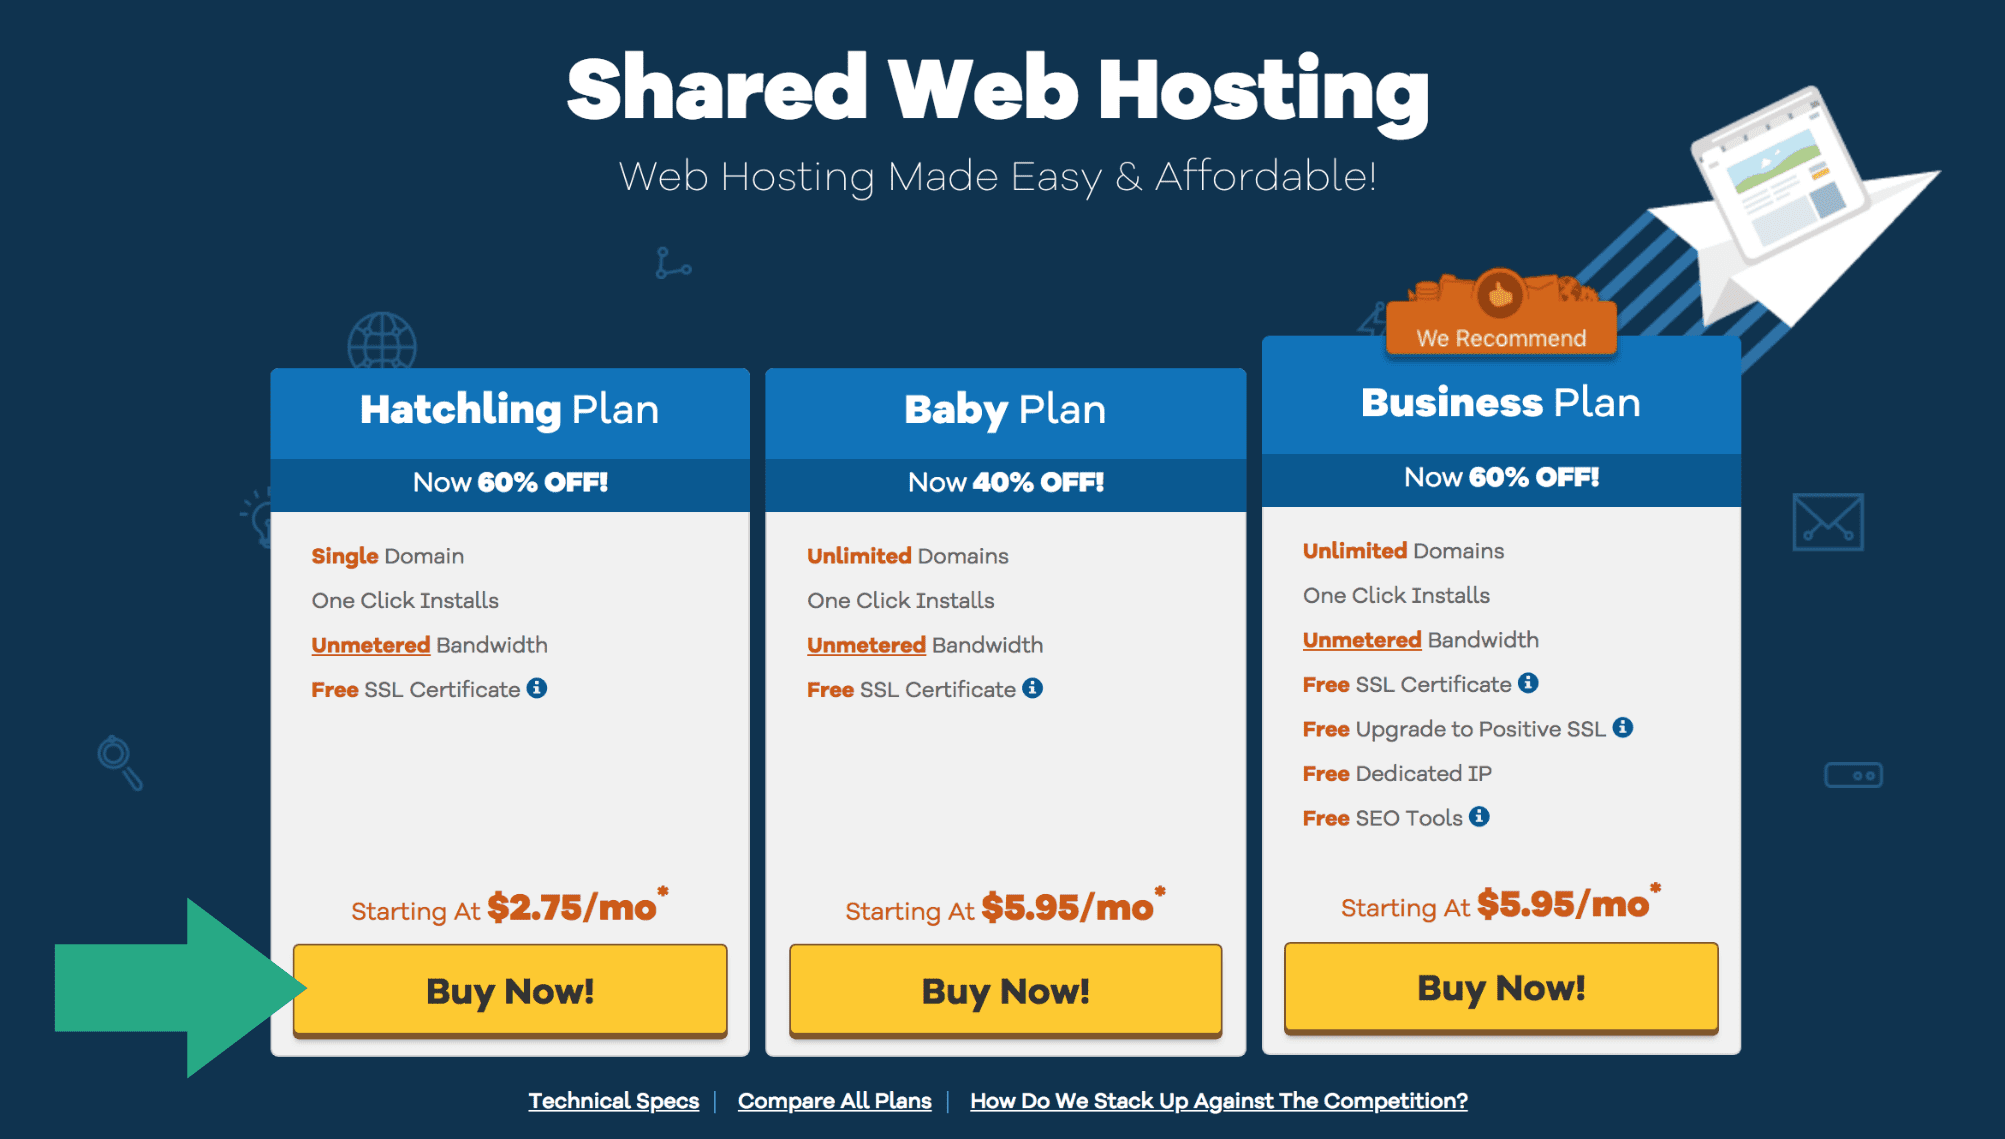

After you click Buy Now, you will be taken to the HostGator Order Form when you can customize your hosting package.
In Step 1 you will be asked to enter the domain name of your website. Your domain name should be as short as possible while also explaining your brand. In this tutorial we will see how to buy a new domain, buy you can easily use a domain you’ve already bought elsewhere. Just enter it in the “I Already Own This Domain” tab and proceed to register hosting.
Wherever you get your domain, after you’re done we will make sure your domain and hosting are perfectly connected.
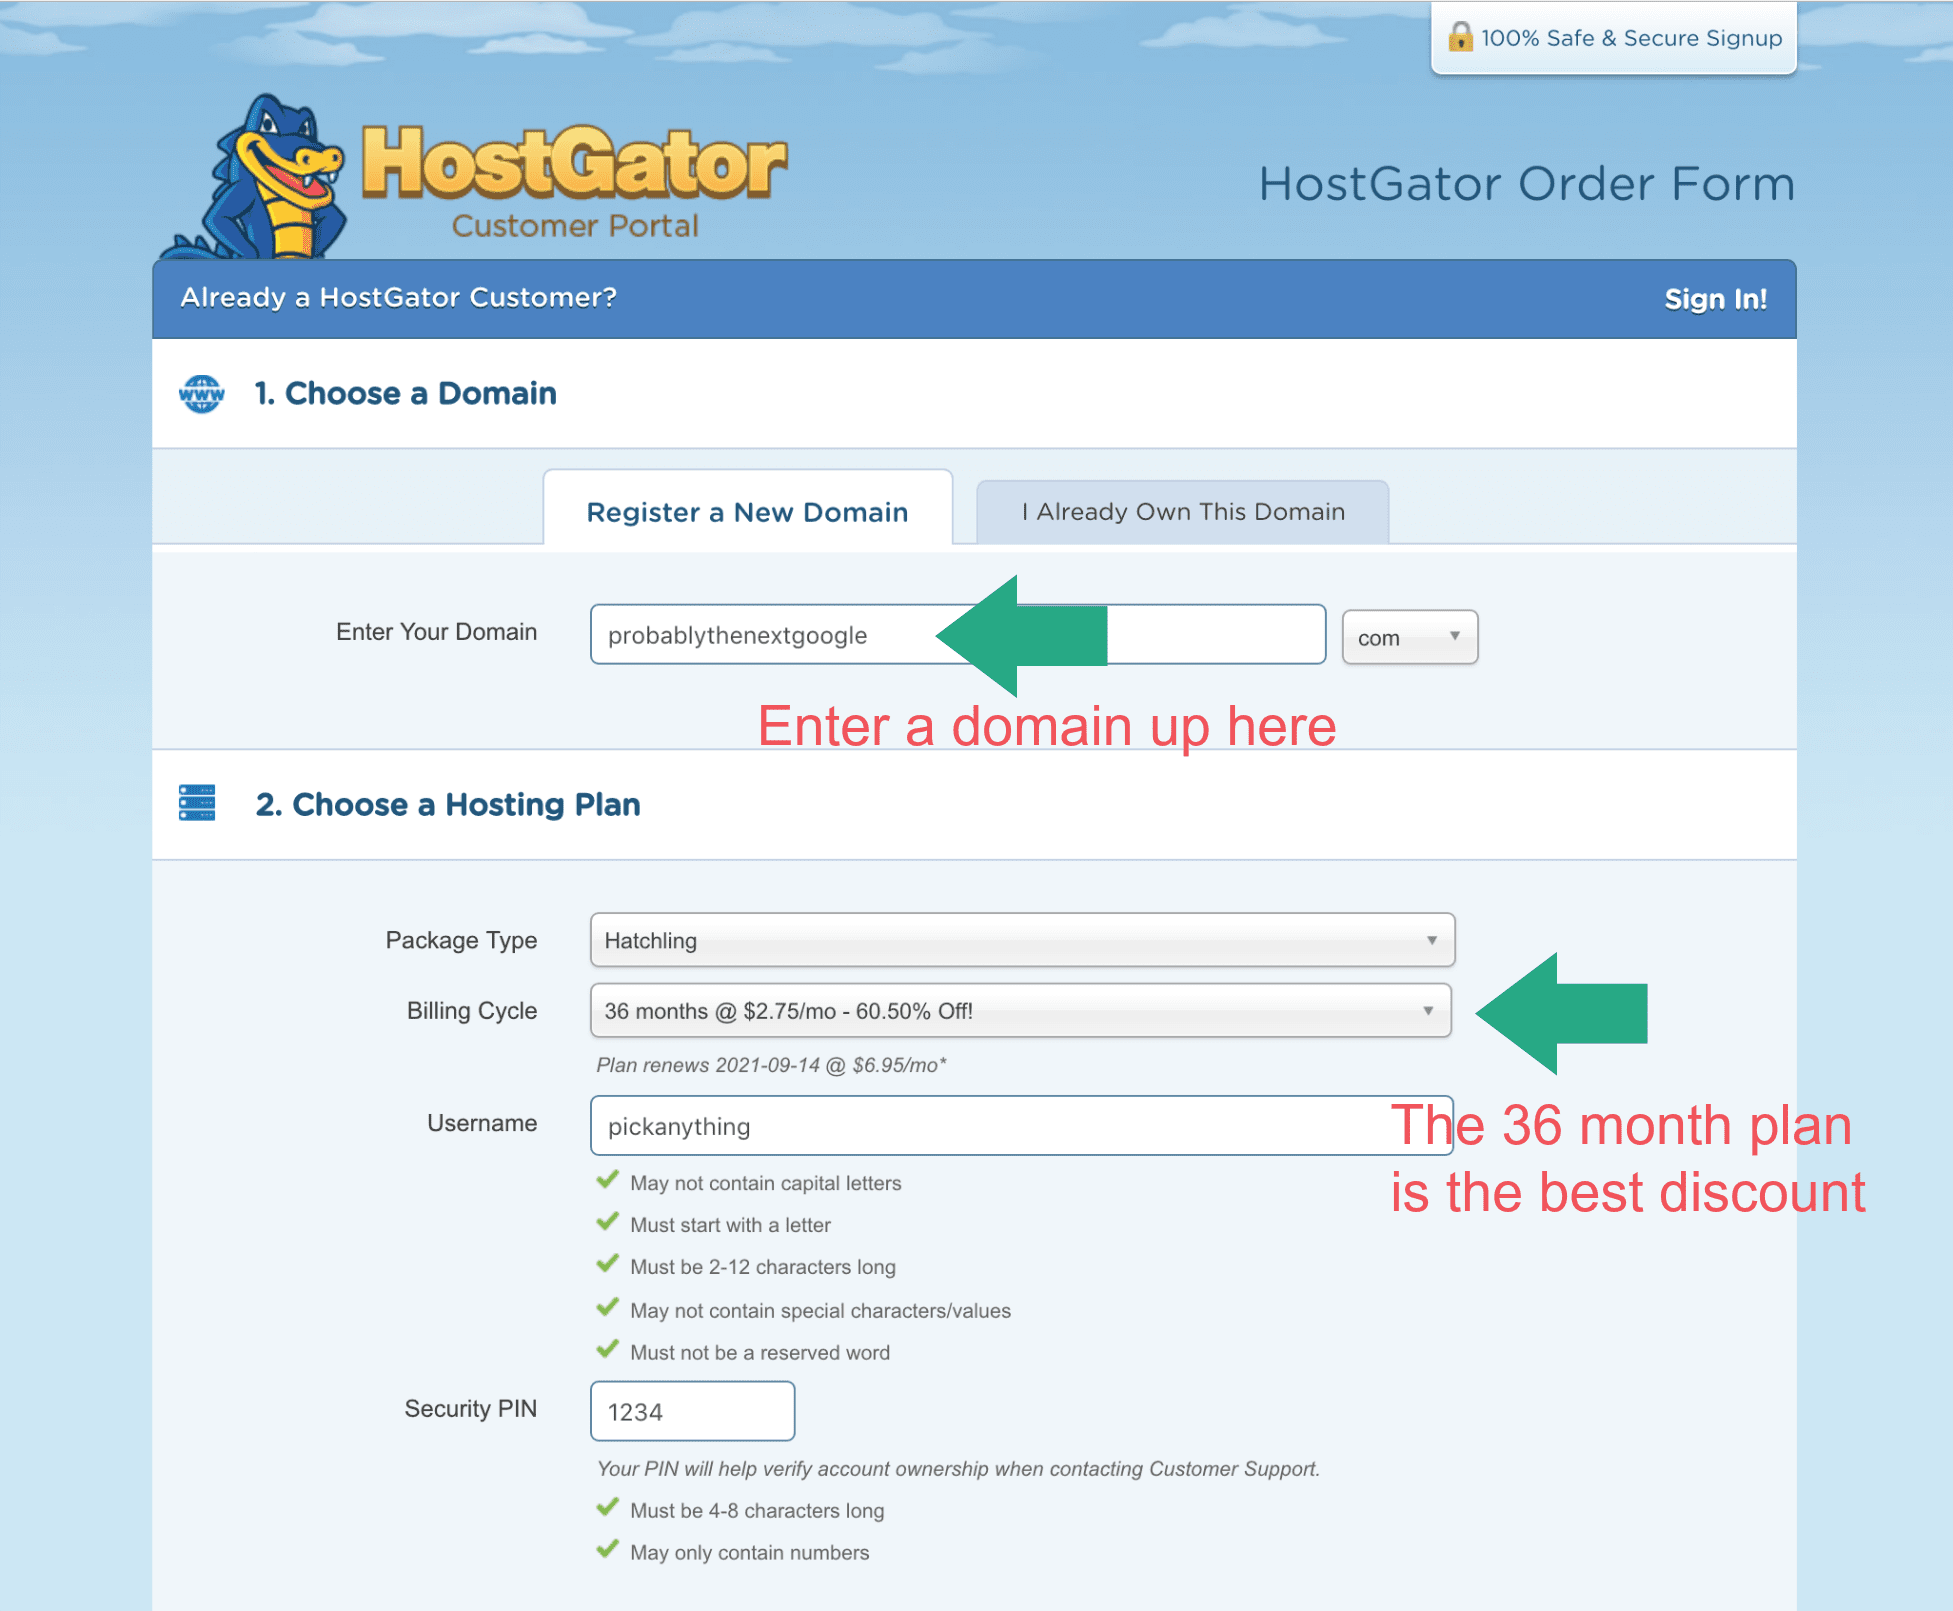

Step 2 just needs you to pick a Username and Security PIN.
Next, in Step 3 just enter your billing info like you would at Amazon, eBay, Apple or wherever you shop online. HostGator is 100% secure and encrypted for all transactions.
Then, in Step 4 you will see additional services. Because we are on a budget, you should uncheck them all. You can always add them in later through the live chat.
Finally in Step 5, it’s time to enter in a coupon code. Fortunately, we can usually beat the default HostGator coupon. Just enter in BigBonus to get a bigger discount. Let me know if it doesn’t work! We have shown below the cheapest possible option with 1 month of hosting selected and a domain name, but your totals may vary. Again, the longer you register hosting for, the larger the total discount.
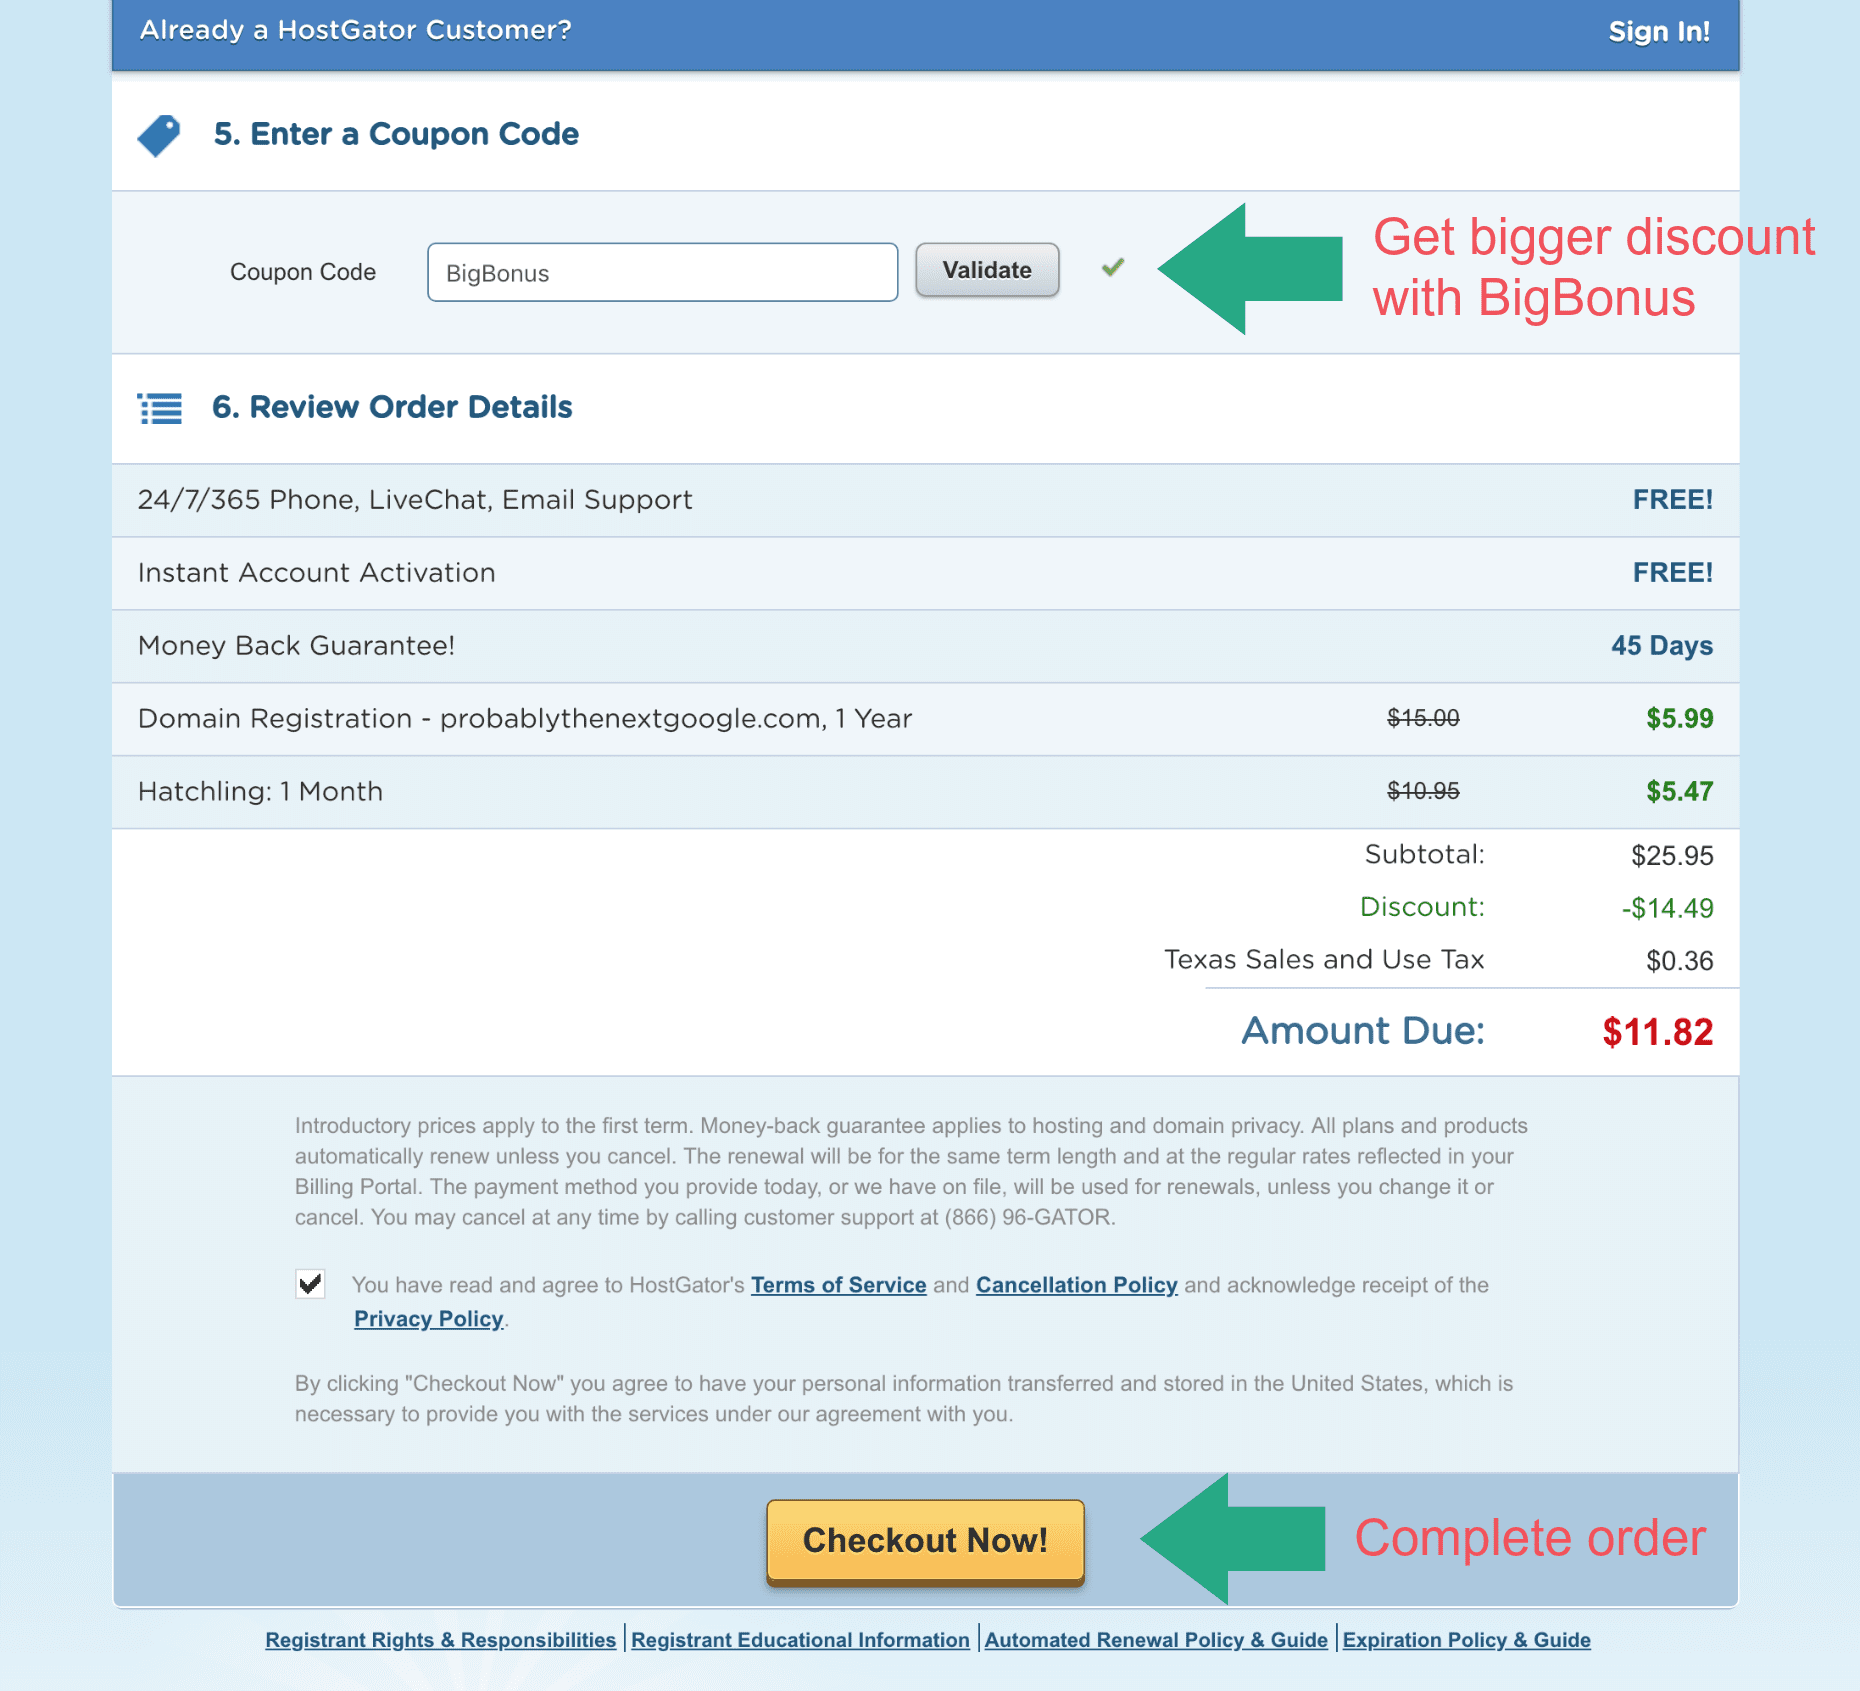

Okay so in Step 6 let’s quickly review your order details. You get a 45 day money back guarantee on all plans, and after we click the yellow button HostGator will instantly activate your account for you. Then you can cruise along and install WordPress onto your new hosting space. Gonna be fun!
Let’s click Checkout Now! to register domain and hosting, and move on to installing WordPress.
What Our 3000+ Happy Readers Are Saying?
Just like getting your first apartment or even a cell phone, setting up WordPress hosting is a tentative, nervous process! Like we said above, we recommend HostGator for the easiest and most affordable WordPress setup. Though it’s certainly not your only option, it has made self-hosted WordPress very easy for our readers and viewers over the years. Here’s a quick sample of what our past readers have told us after they got setup!


♨


While our guide has worked for thousands of people from all walks of life, as you can see there are always questions as people create a WordPress blog, even somewhere known to be beginner friendly like HostGator. Please ask yours in the comments!
So, yes, this tutorial assumes you are using Hostgator to setup the self hosted blog; Of course, at the end of the day it’s up to you, and if you do end up going with a different host, the steps below should be relatively similar and should prove at least somewhat helpful either way.
Great job, 95% of the hard stuff is done, because you’ve made the commitment to yourself and your business to take your blogging to the next level. This step is key on the road to blog for a living and we all look back on it fondly. I’m so happy to take this step with you.
“The journey of a thousand miles begins with a single step.” – Lao Tzu
Step 2: Install WordPress
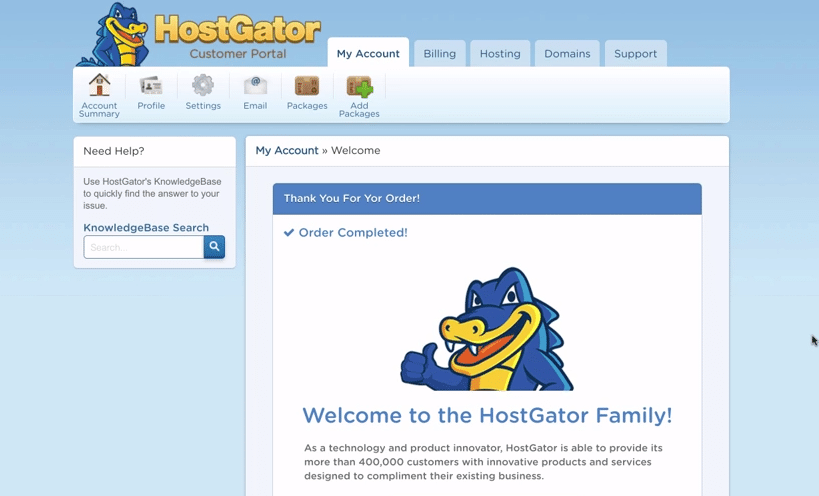

After you click Checkout Now at HostGator, you’ll be brought to a welcome screen like the one above. It’s really easy to set up your self hosted WordPress blog from here (and by the way, Welcome to the HostGator Family!)
Just click on the Hosting tab.

Note: if you closed your Internet screen by accident, visit portal(dot)hostgator(dot)com to get back here. Your username and login will be emailed to you in an email called Billing.
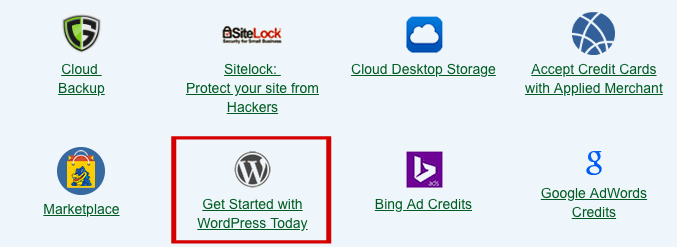
Inside the Hosting tab, scroll down and click Get Started with WordPress Today.

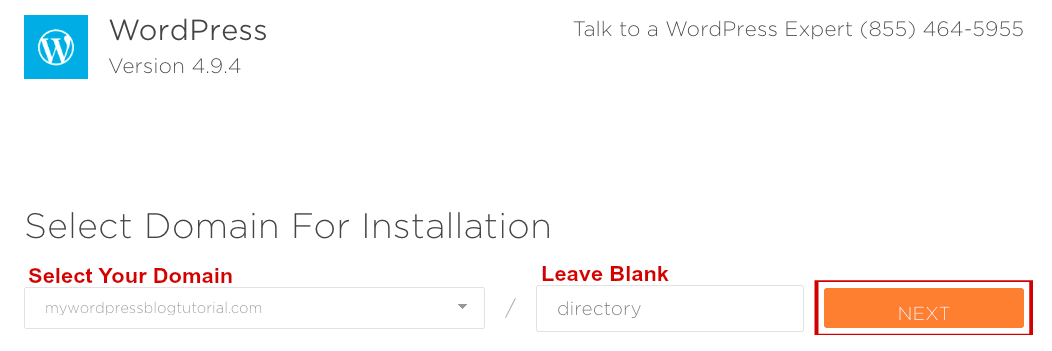
A new window will open. On this screen, select your domain name, and leave the /directory box blank. Then click Next.

Now we are truly almost there. Enter in your Install Settings. Most importantly, pick a good username as this will be your WordPress login username and what will show up as “by ____” when you publish your first post. Also, double check your email as WordPress will email you login details.
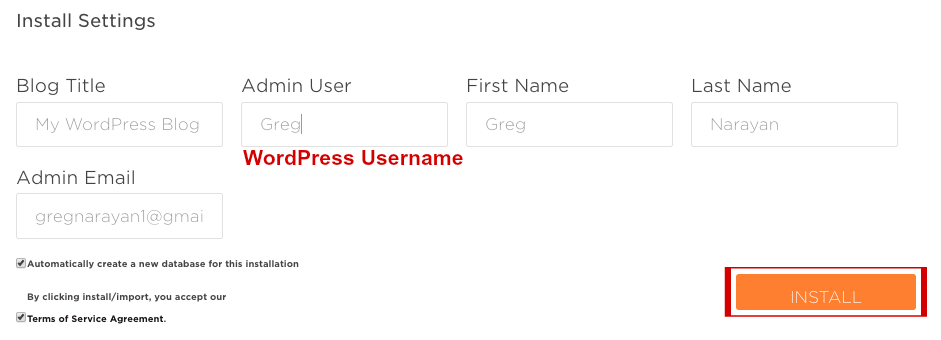

Lastly, just check the two boxes below your install settings, and then click Install!
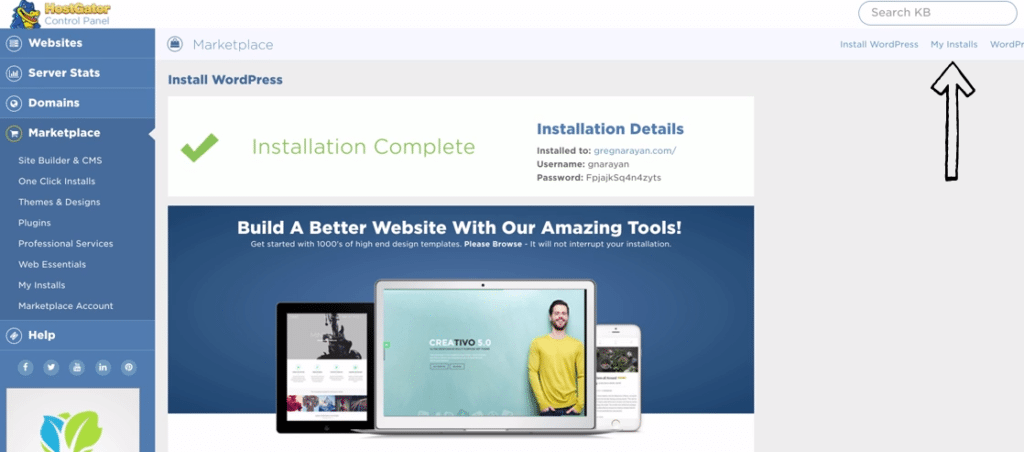
HostGator will do all the fancy tech stuff for you, and you’ll hopefully get the Installation Complete screen. Great job!

Please leave this screen open now. We want to make sure you get the WordPress Install Complete welcome email as well before closing it. So your best bet is in fact to take a 10 minute break right now.
After you get your WordPress welcome email, you can click on the My Installs link the arrow points to above, and change your password.
WordPress Welcome Email

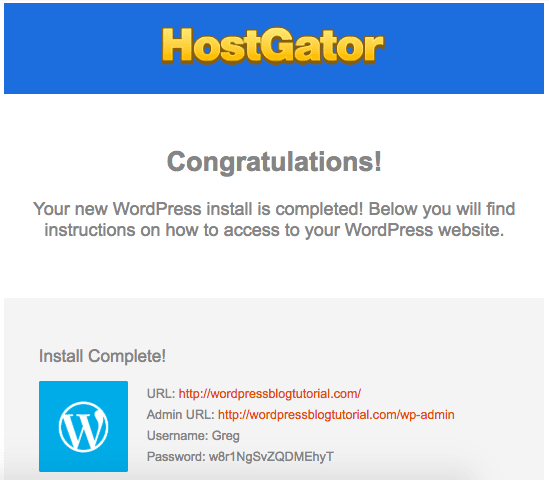
The music will play in the background as you receive your Welcome Install Complete email. Welcome to WordPress!
There’s one hurdle though.
If you click on your URL or Admin URL, your site might not be ready. It can take up to 30 minutes for your files to settle into place.
Step 3: Connect Domain to Hosting
While your new WordPress gets itself ready for your first login, there’s an important step we need to take a look at now.
That would be, checking your nameservers. Nameservers are used to connect your domain name to your web hosting. And in fact, whether you bought your domain at HostGator or elsewhere, you actually need to double check your nameservers. This is an annoying step, but a step you’ll be glad you know if you decide to create a WordPress blog again or setup other WordPress websites (for clients for example) in the future.
Start by visiting your inbox, and opening the email called Your Account Info from HostGator.
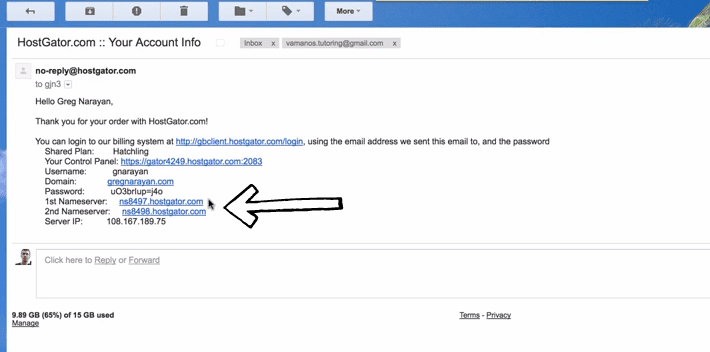

All you have to do first is write down your 1st Nameserver and 2nd Nameserver. Then, choose from the below.
If you got a domain from HostGator:
Login to your Billing portal where we installed WordPress (billing(dot)hostgator(dot)com). Click Domains. Next click the gear icon, then by Nameservers, click change, and make sure your nameservers from the Your Account Info email match these ones here.
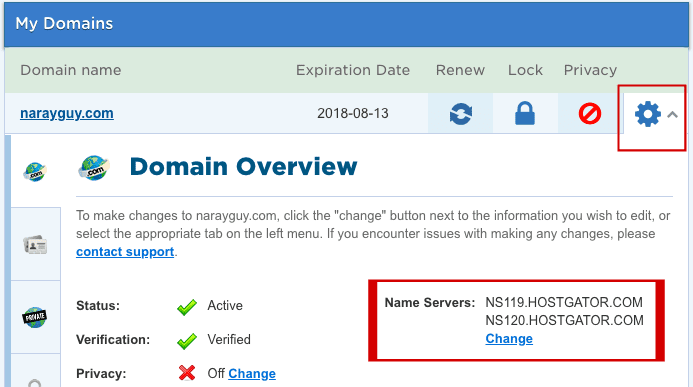

Click Save Name Servers.
If you got a domain from GoDaddy or elsewhere:
We have a quick YouTube video on how to change nameservers at GoDaddy. This is not hard and 100% necessary in order to see your WordPress blog when you look at your domain name. Let us know if you get lost or have registrar specific questions.
In the timespan it takes you to learn a little about nameservers above, your WordPress site should have become ready to login, so let’s do it!
P.S. You’ve now completed your domain and hosting setup, including the WordPress installation. Wasn’t that pretty easy? Click here to head over to HostGator and complete the above steps if you haven’t already!
Step 4: Let’s Login to WordPress
In order to use WordPress, you need to first login to your Dashboard. Your Dashboard is the backend, where you make all your changes.
It order to get to the login screen, visit the Admin URL in your WordPress welcome email, or type in yourdomain(DOT)com/WP-ADMIN to your browser.

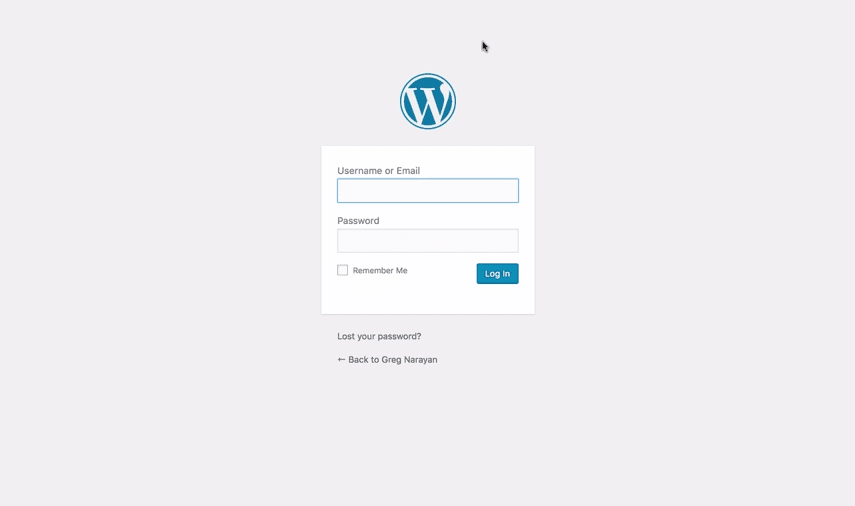
You can also bookmark your login link for ease later on. I prefer having it on the browser bookmark tabs, along with 9000 other links.
Login to WordPress for the first time using your password from the WordPress welcome email, and your Username du jour.
Welcome to WordPress! You did it!
First Steps in WordPress
Despite having the #1 publishing tool on the planet now, you also have a publishing tool that’s been known to be a little scarce on support. That’s why we’re here, for unlimited support as your create a WordPress blog from the ground up.
To help you setup your site from the first login onwards, I’d like to explain what to do right away in your default WordPress site. These are ideal first steps whatever direction you want to take.

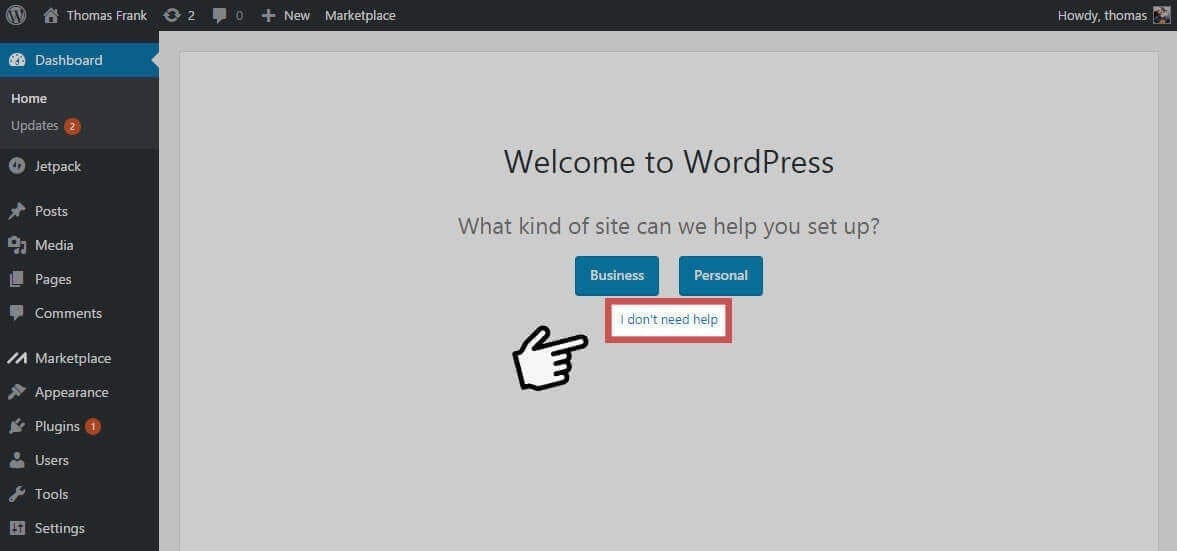
Once you login you’ll see the Welcome to WordPress screen. Click “I don’t need help” because we’ll setup a way better self hosted WordPress blog / website and probably don’t want pay for help.
You can do SO much in WordPress. You just have to experiment.
Here’s the Dashboard at DearBlogger right now. Keep in mind we’ve been building for a serious minute. Still, your dashboard will have some similarities to ours, like:
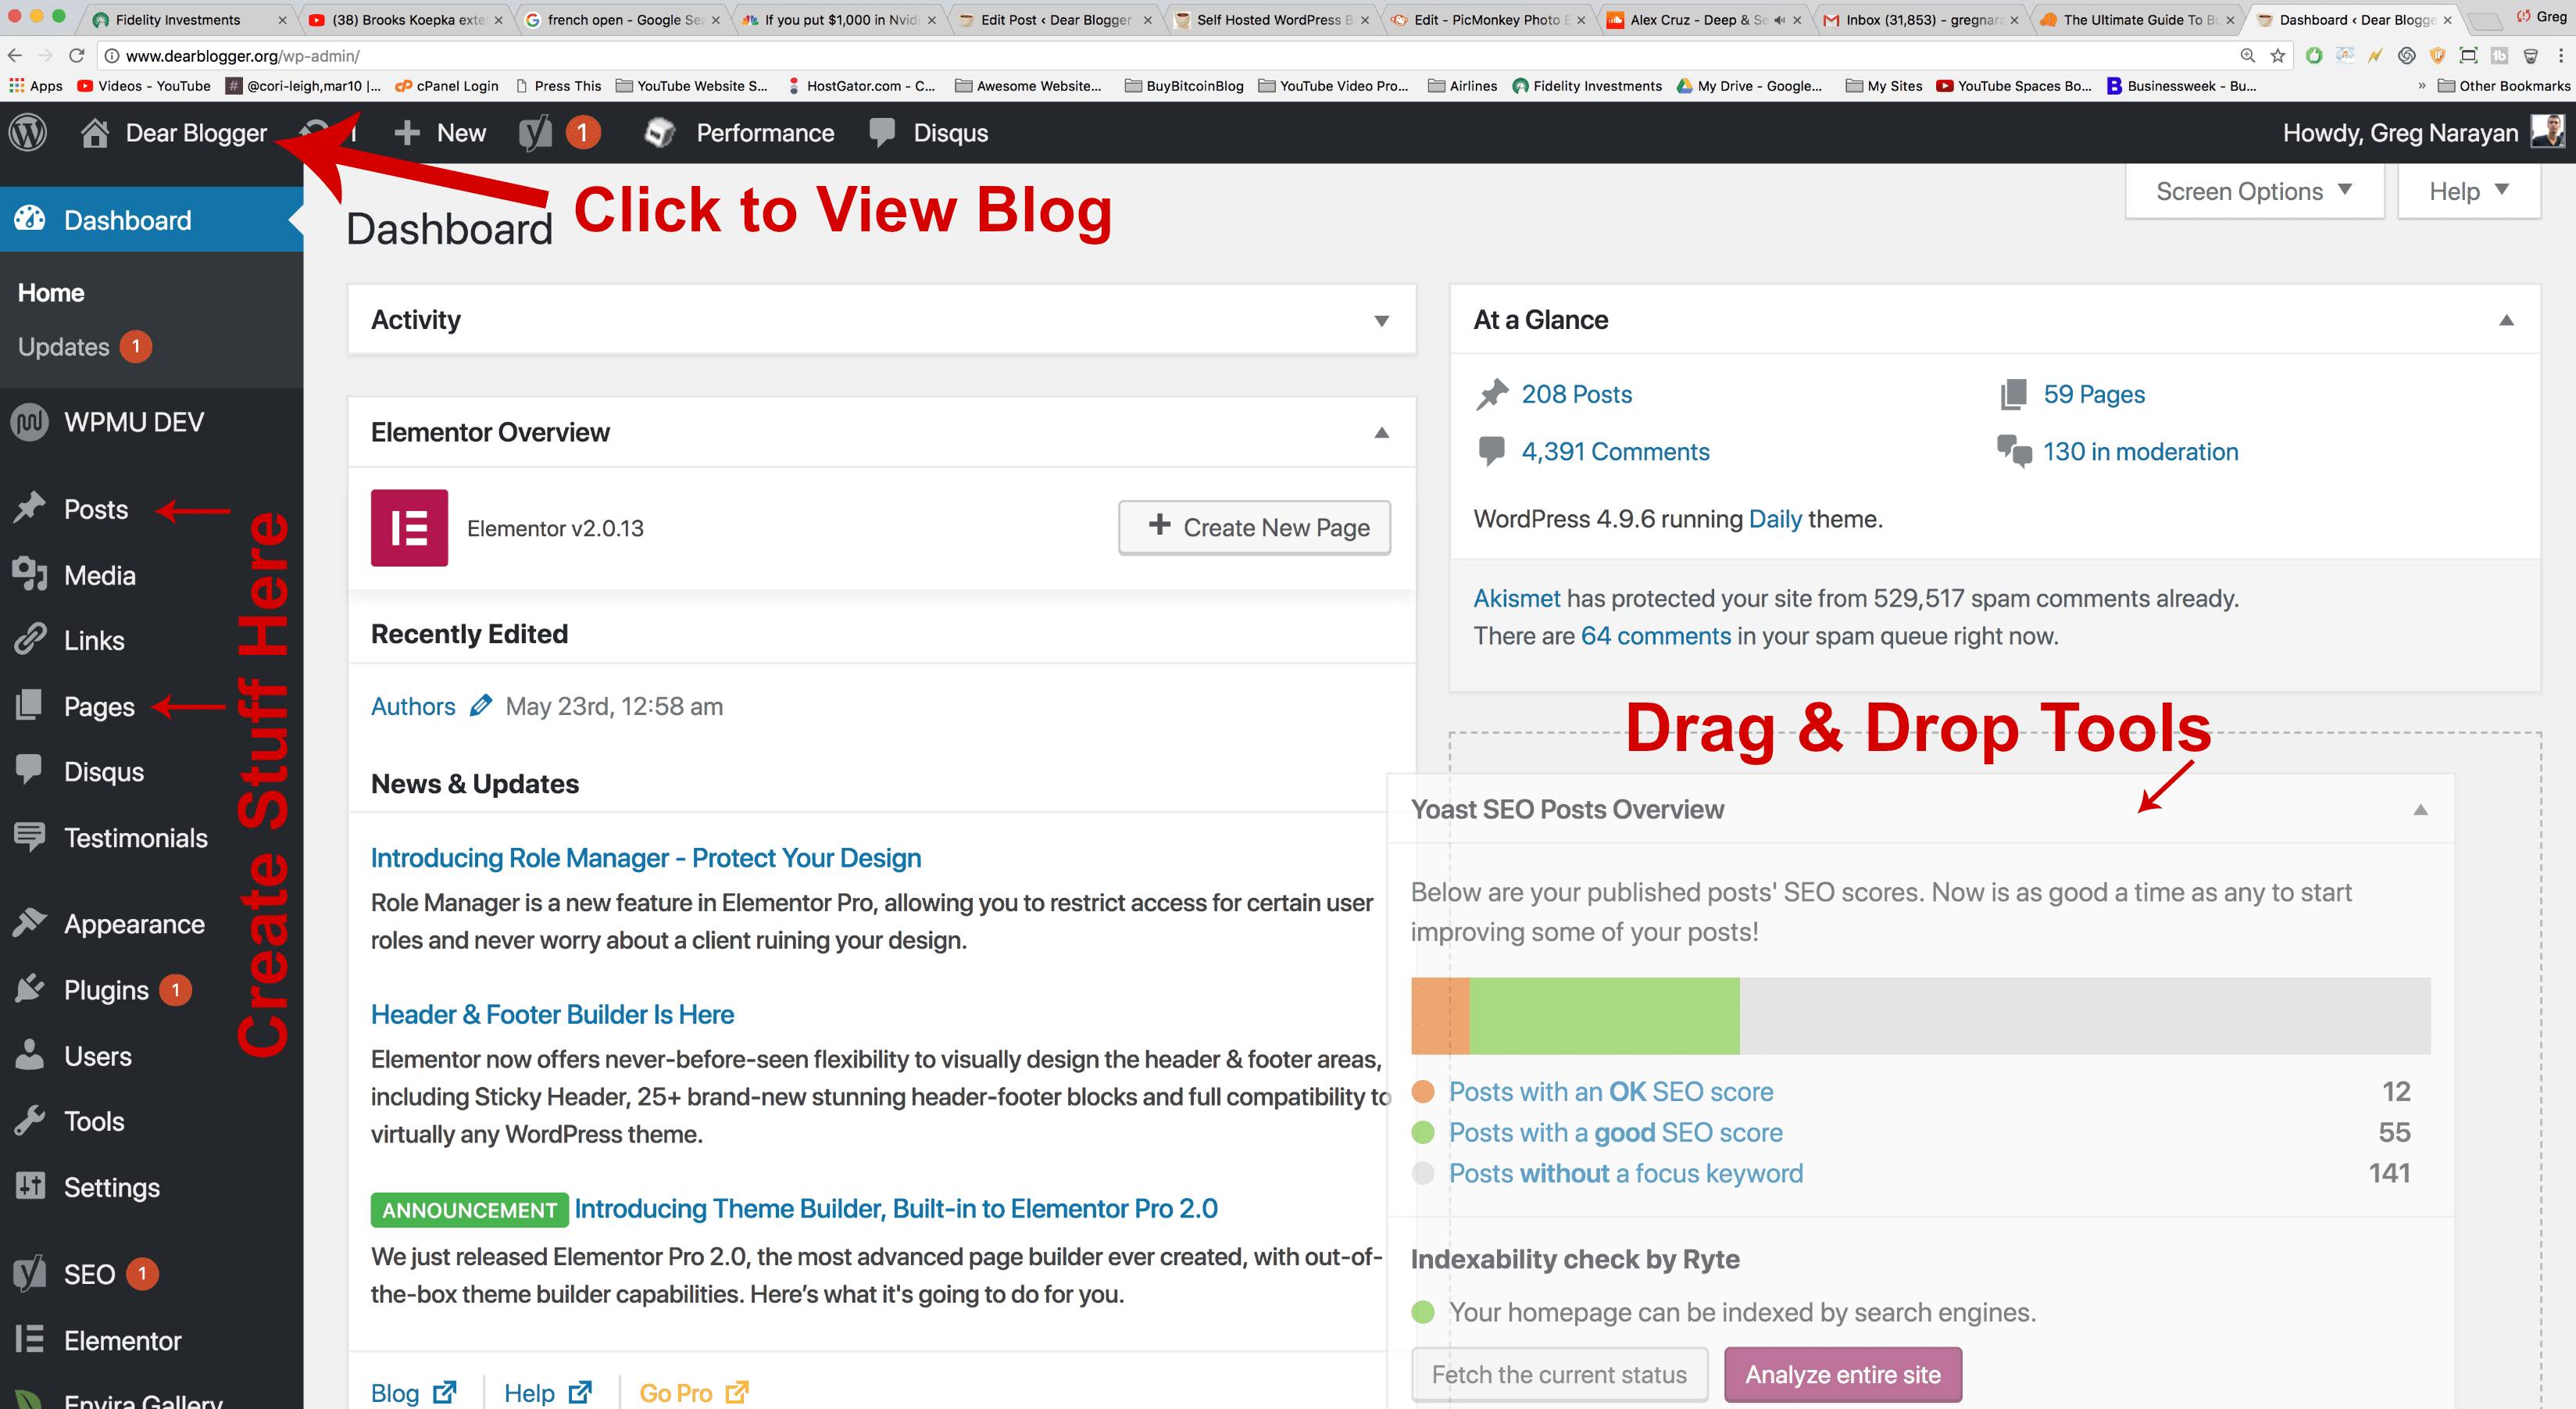

- Drag and drop tools, these are things like News & Updates from WordPress themselves, and At a Glance site statistics. These are optional to use.
- We always click on the upper left Home icon where it says your Site Title (“Dear Blogger” in my case) to get to the front end and view your blog.
- We always create stuff using the left hand navigation tabs, like Posts and Pages.
However, items like Disqus, Elementor, and SEO you see on our left navigation are from free plugins we’ve installed, and you can too. But WordPress doesn’t come with all this by default – they can’t guess your needs – so you have to experiment and add things! And also, ask questions 🙂
So, speaking of experimenting and getting our hands a little dirty, maybe you’re ready to finally add your first plugin?
If so, I’ve got the perfect one for you.
Enable a Coming Soon Page with a Plugin
A coming soon page is a nice professional touch that let’s people know you care about their first impression and are hard at work too. Most new WordPress blogs come with a default coming soon page which doesn’t much represent your brand. So let’s make a new coming soon page, then disable the old one if it exists.

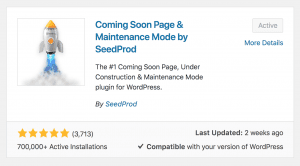
We’ve got a great plugin (which we use here) to setup your new coming soon page:
- Hover on Plugins and click Add New
- Search for Coming Soon Page by SeedProd
- Click Install, then click Activate
- Now hover on Settings and click Coming Soon Page & Maintenance Mode
Once you’re in the settings for our coming soon plugin, you can follow these steps to setup the basic coming soon page your visitors will see.
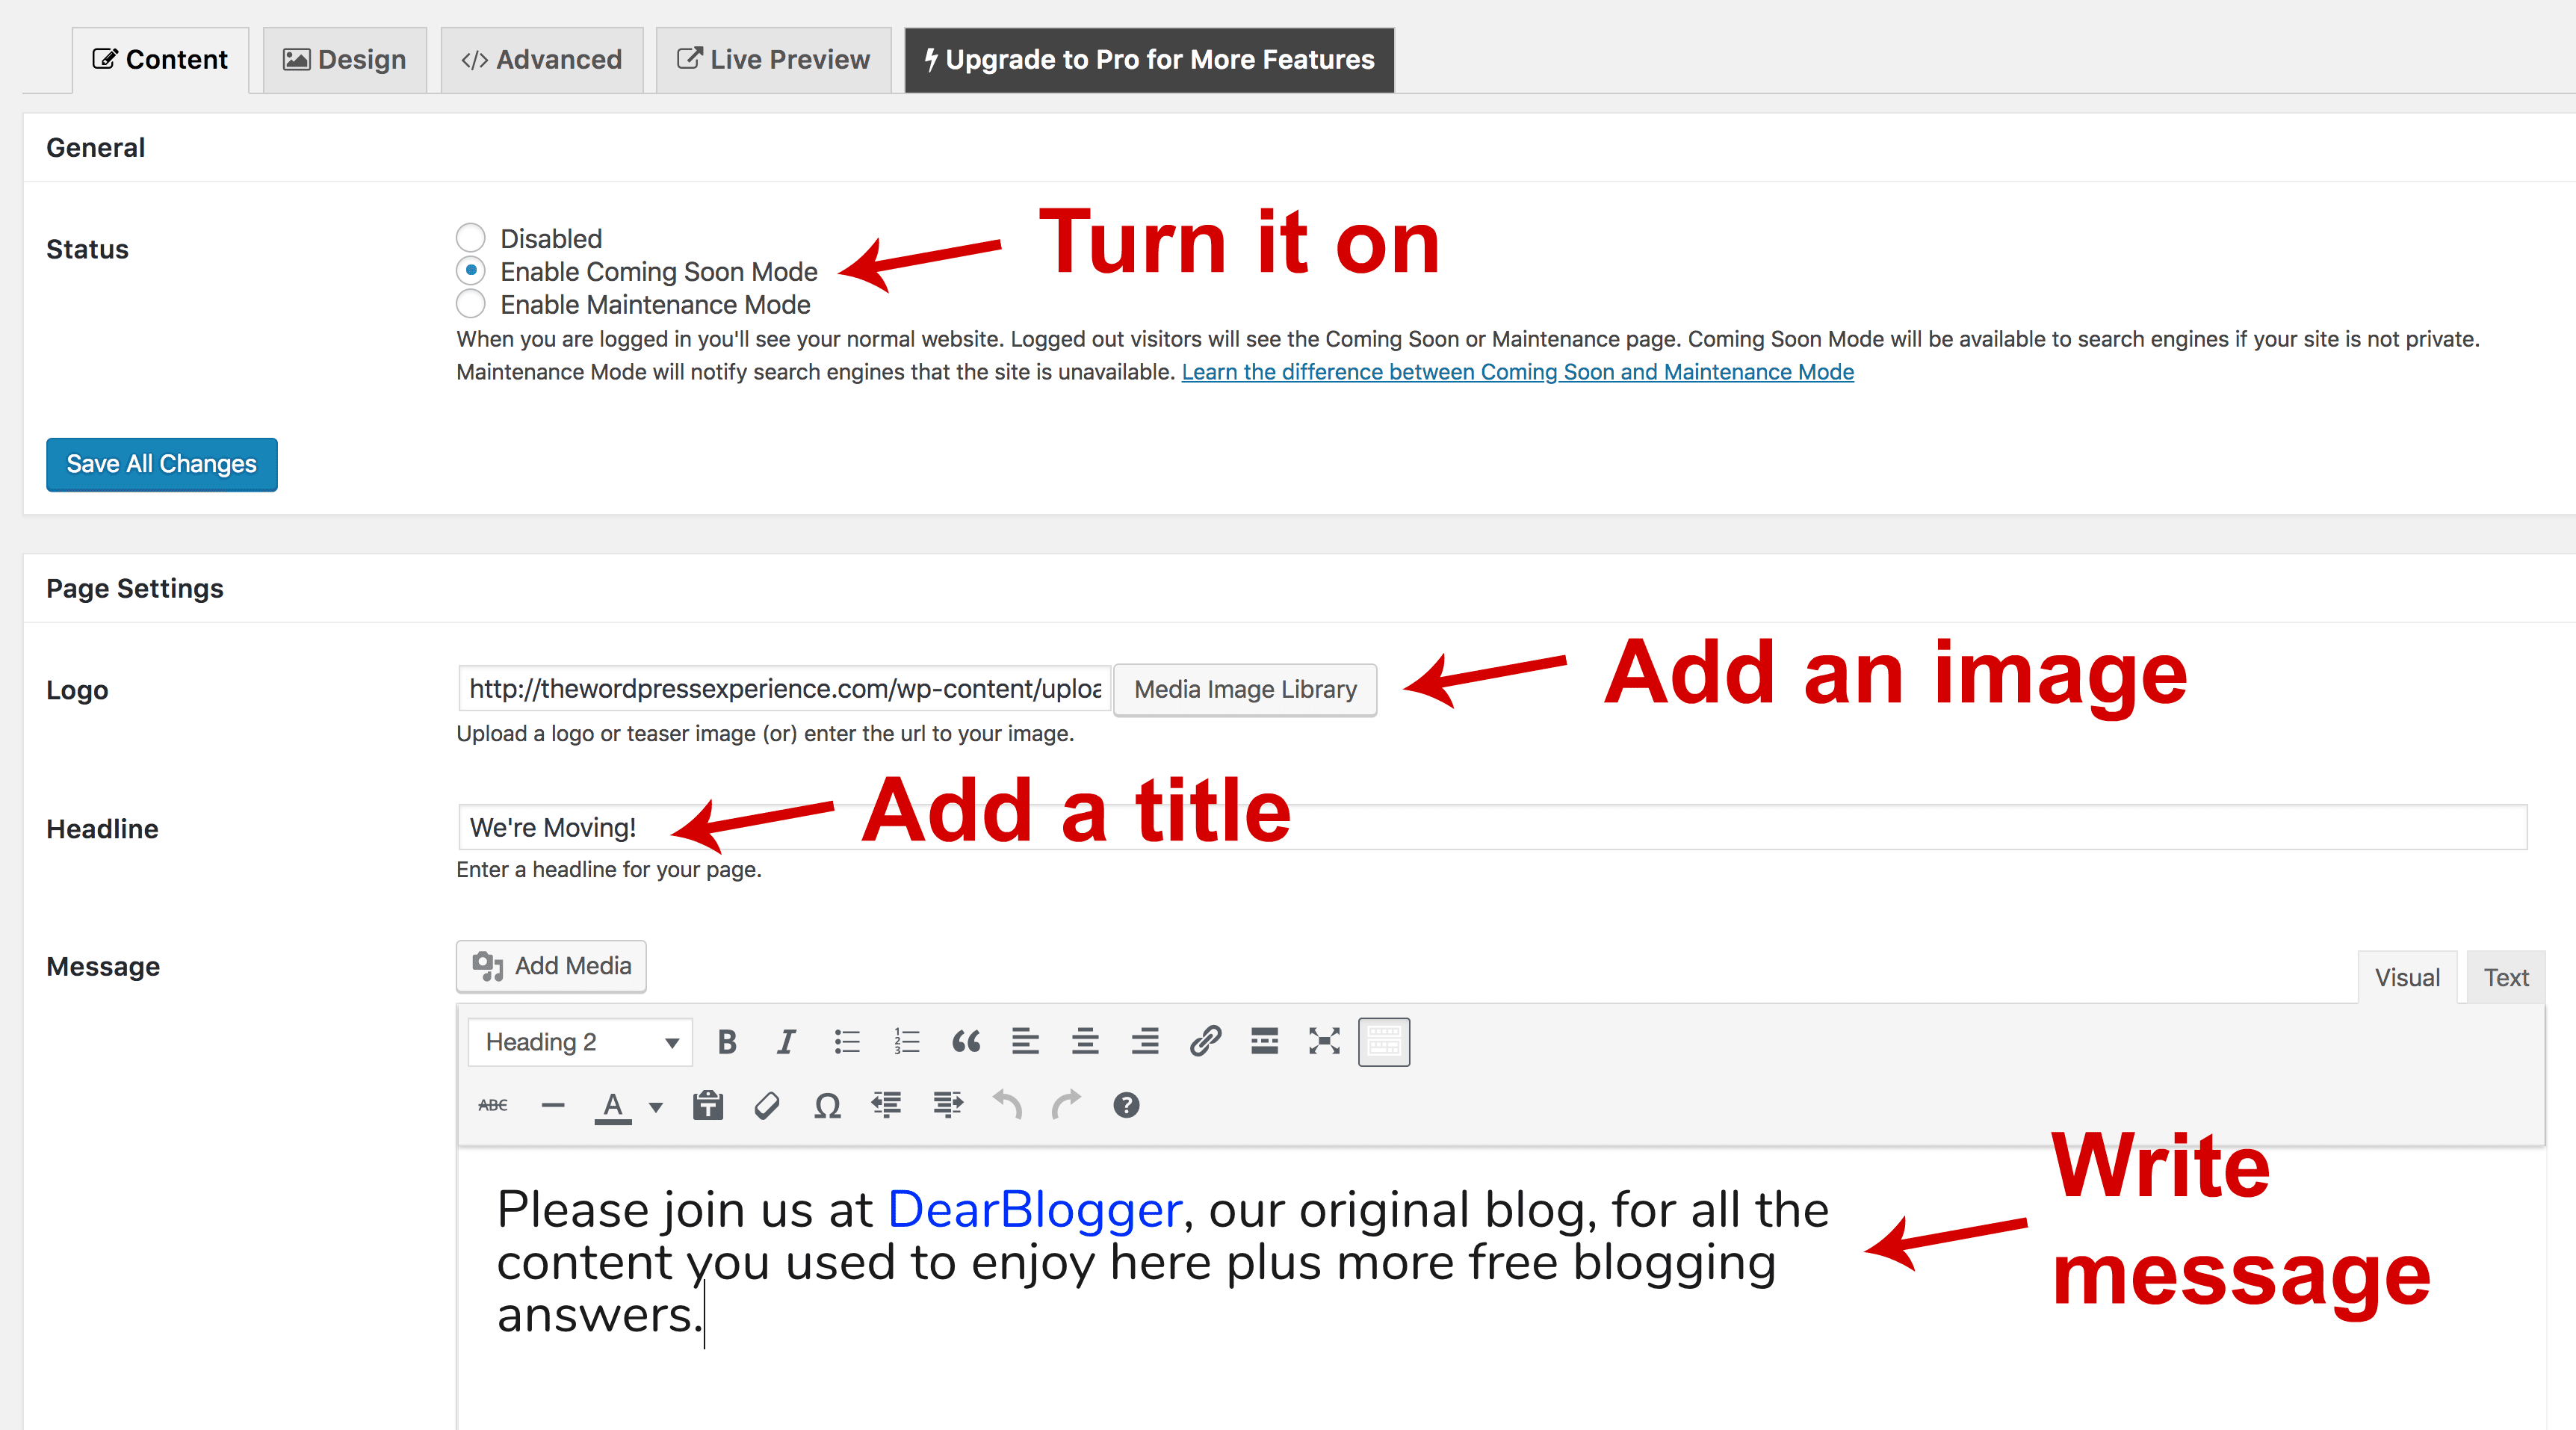

Next, here’s how to add an image, fully explained. First click that Media Image Library button, then:
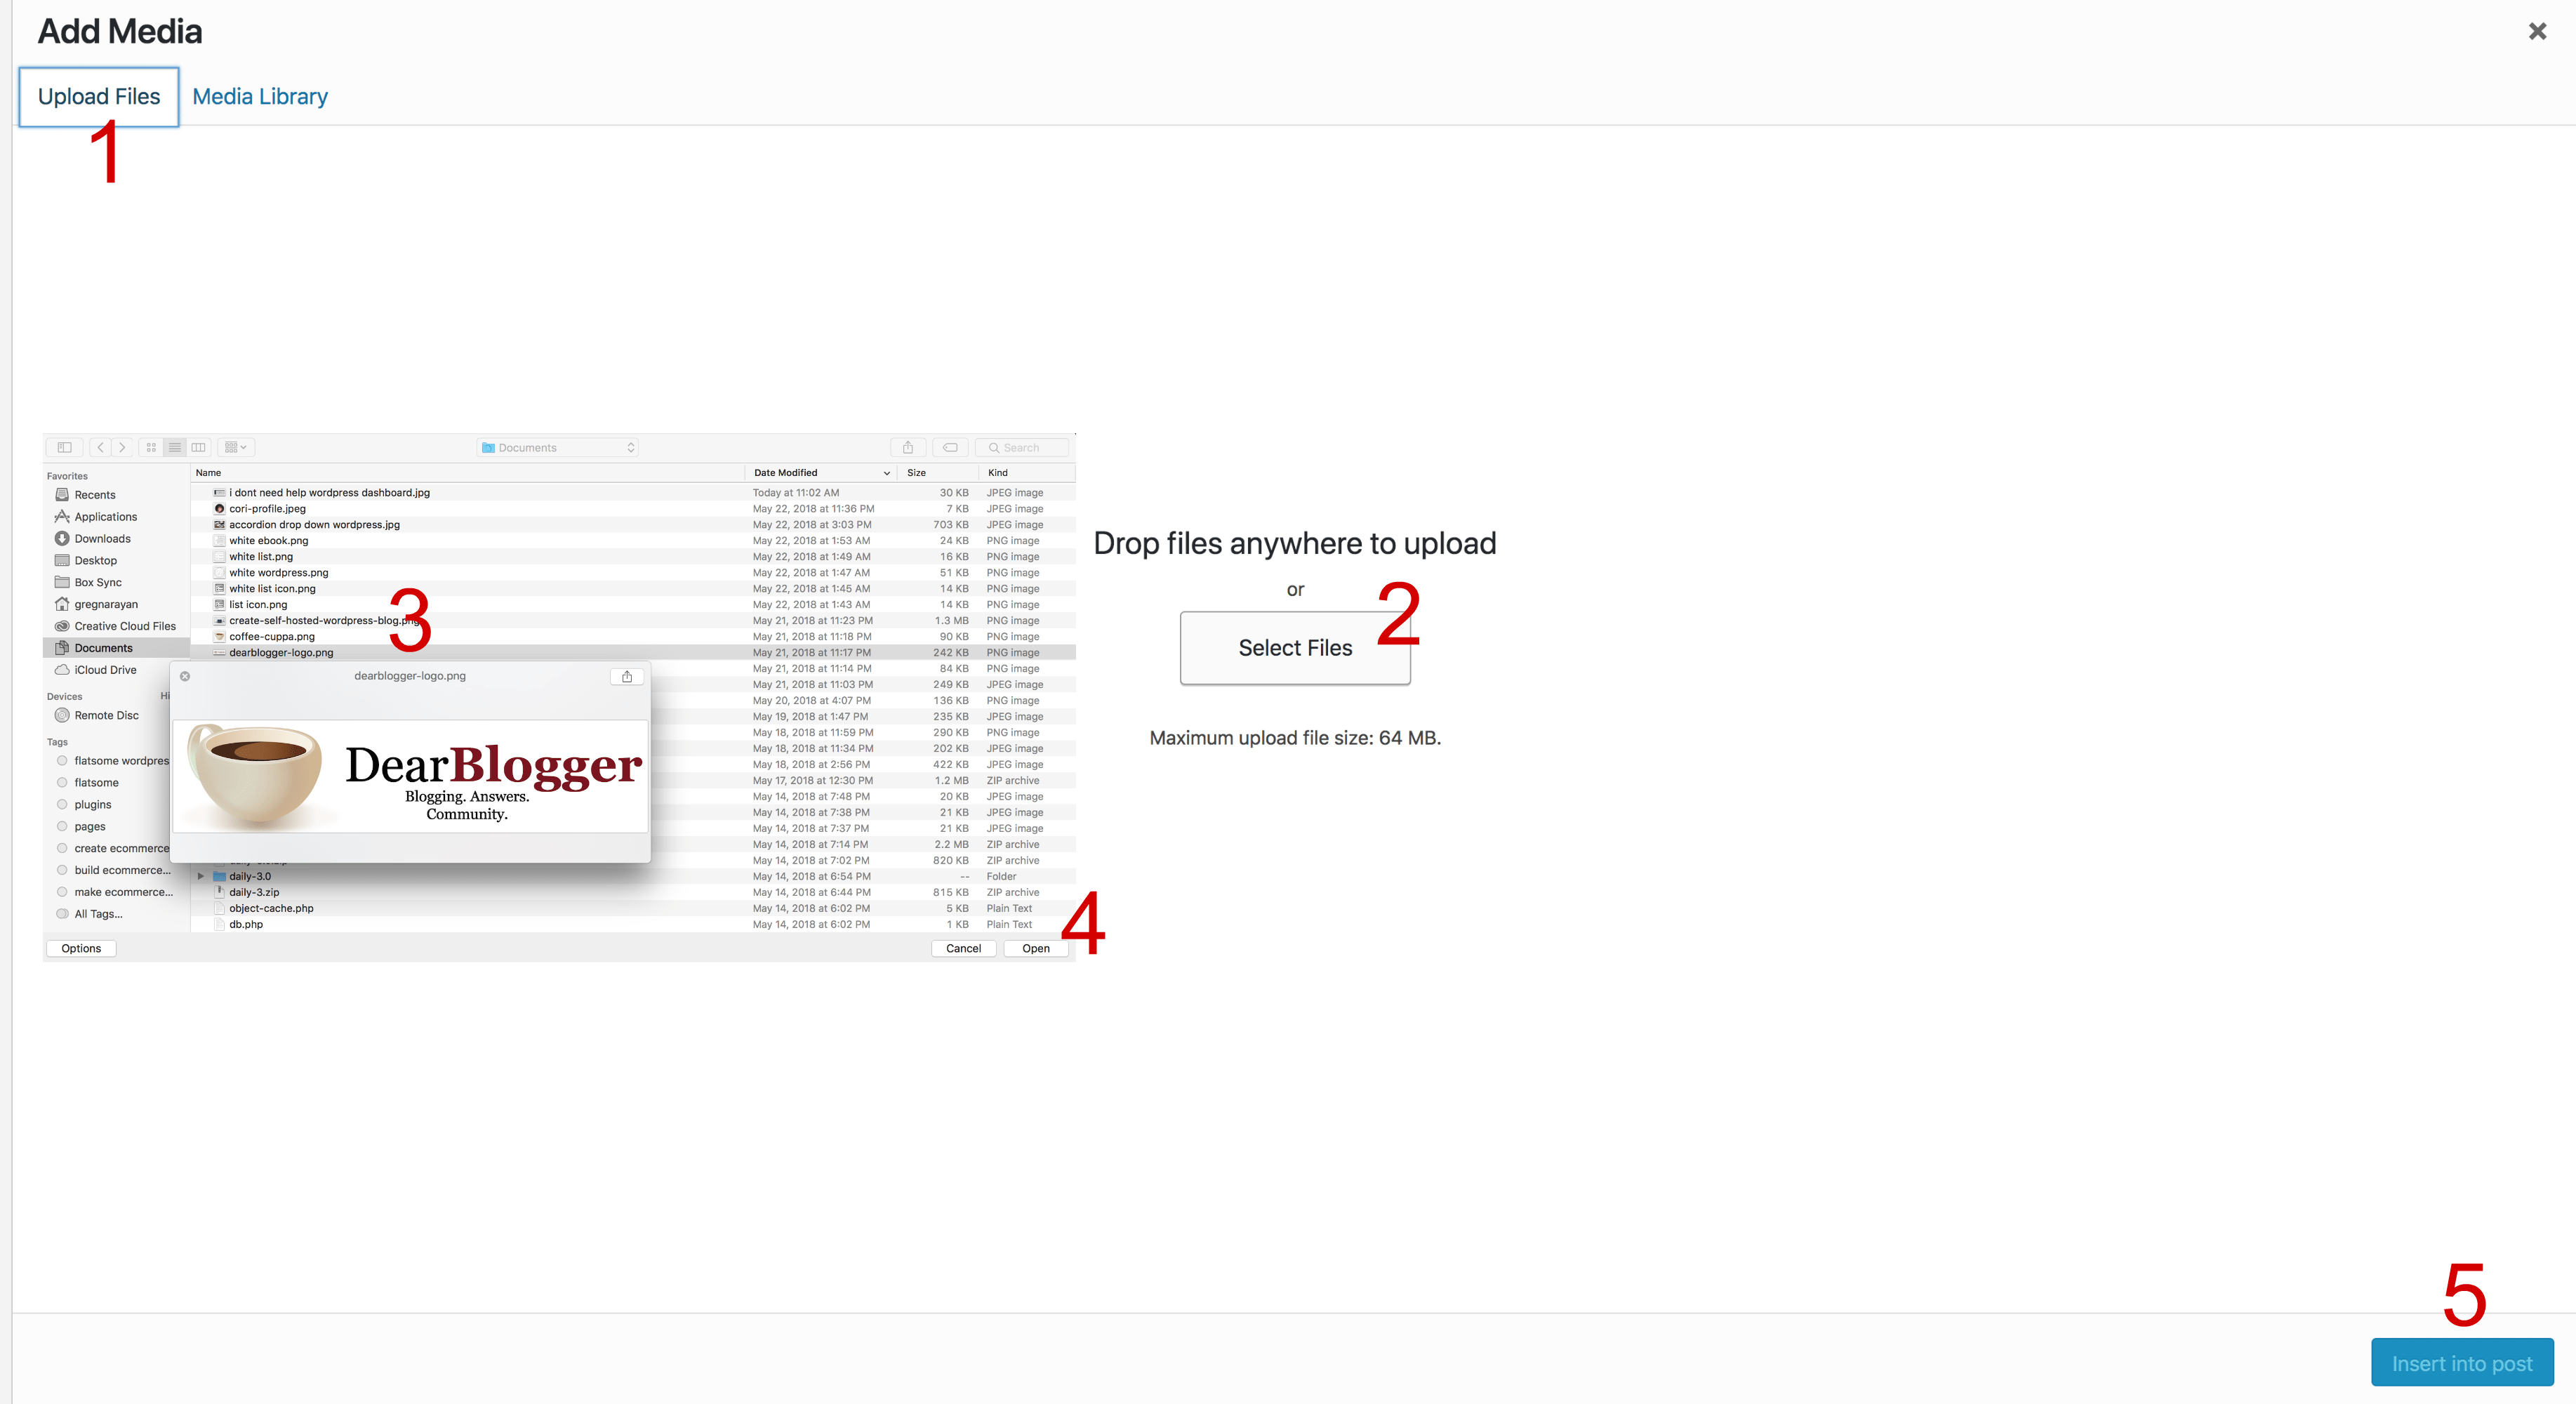

Click in the numbered order above to successfully upload your image:
- Click Upload Files
- Click Select Files
- Find your logo or image on your computer
- Click Open
- Lastly, click Insert into post
This is also the general process to add any image into a WordPress blog post or page, so now you know that too!
Once your coming soon page is all edited and ready to go, click the blue Save All Changes button. To test your coming soon page, you can open a new browser tab in incognito mode (in Chrome on a Mac which I’m using that’s command+shift+new) and visit your domain name. Or simply logout and view it. When you’re logged in, you’ll see your actual site and all the edits you make.
And when you’re ready to launch, just Disable this coming soon page!
How to Add Posts in WordPress
Adding posts in WordPress will become ridiculously easy, but like everything, it takes some getting used to. To add your first post, click Posts on the left. I would Trash the sample post. Now click Add New up top. The editor presents you with several tools similar to Microsoft Word.

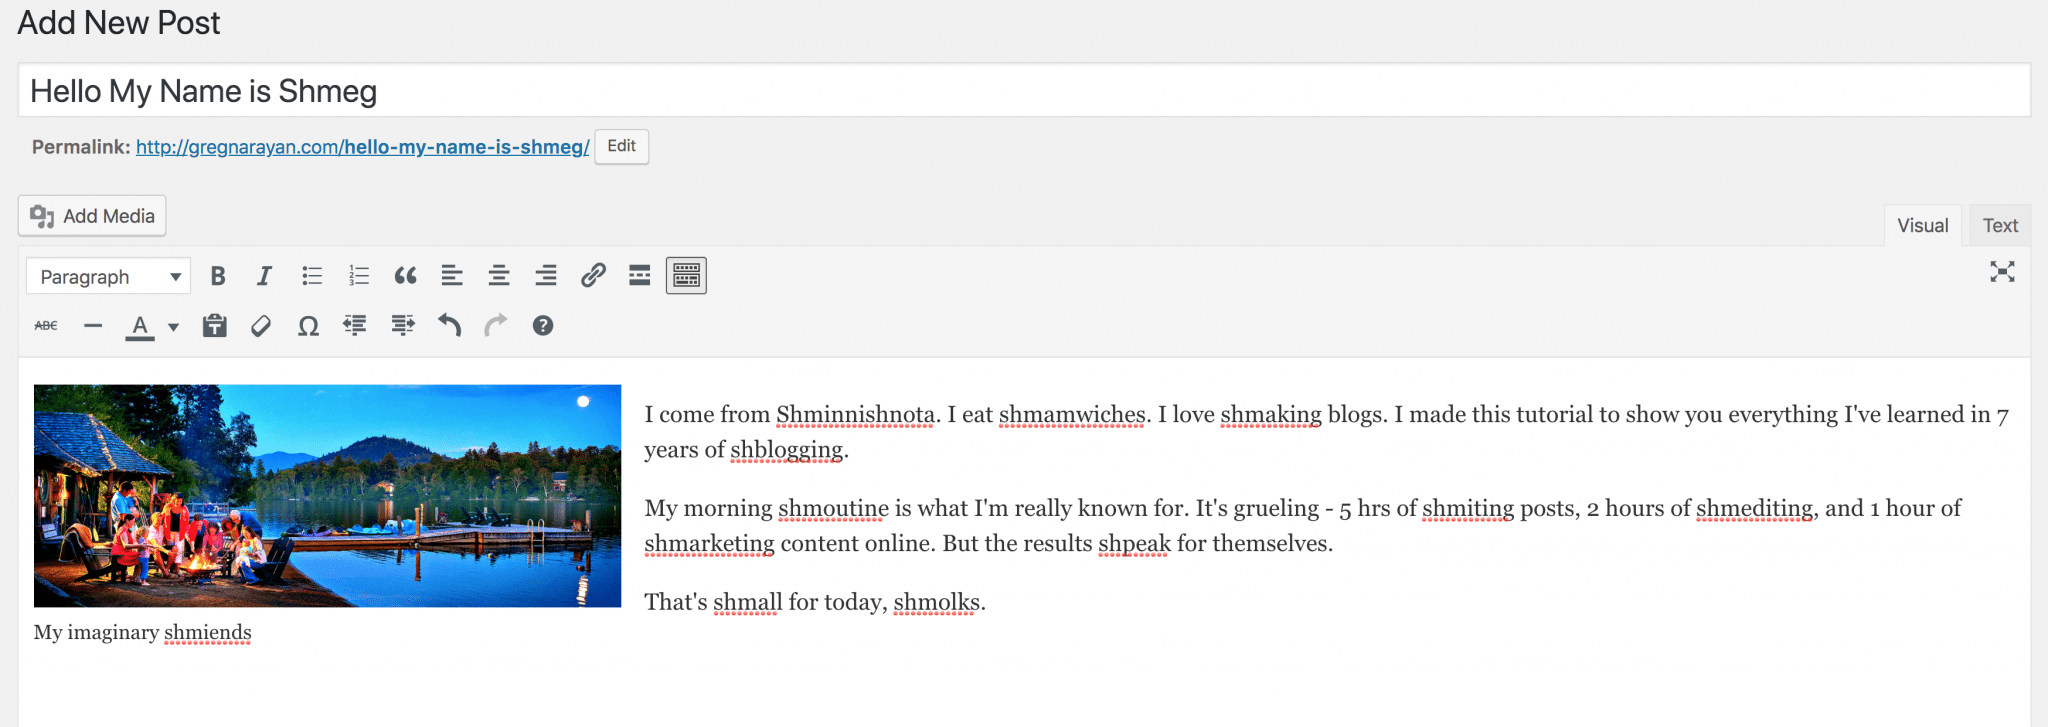
Once you’ve written some amazing content, you can do things like add a link:


Next, you can click on top of an image to change how it sits in your post (right, left, center). And you can click on the white boxes around your image to drag it larger or smaller.
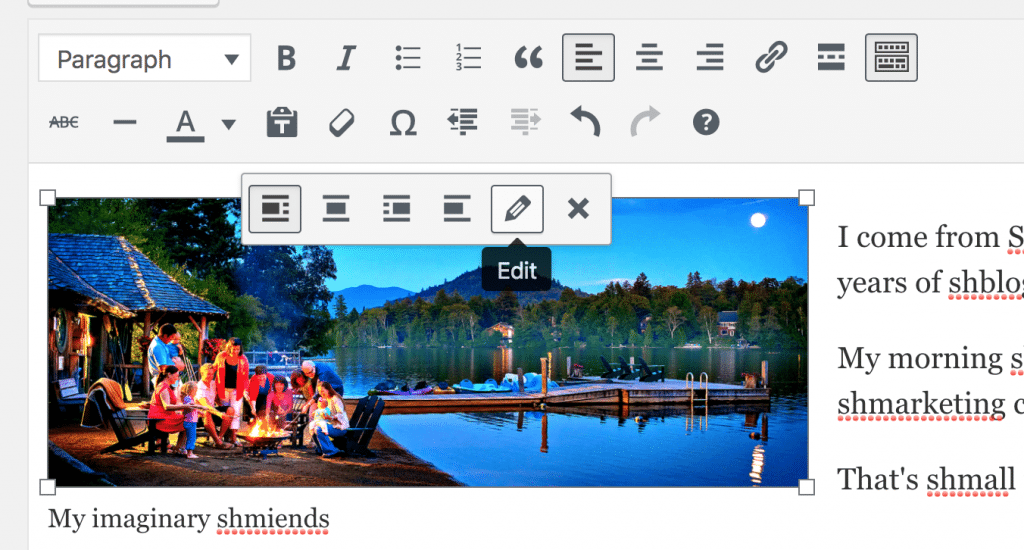

It’s key to remember that you can highlight some text or just click on your images to adjust their settings. When in doubt, just click on things and play around. Keep in mind that most buttons in WordPress, like publish, for example, just need one click to work, as opposed to the double-click!
Step 5: Selecting The Best WordPress Theme
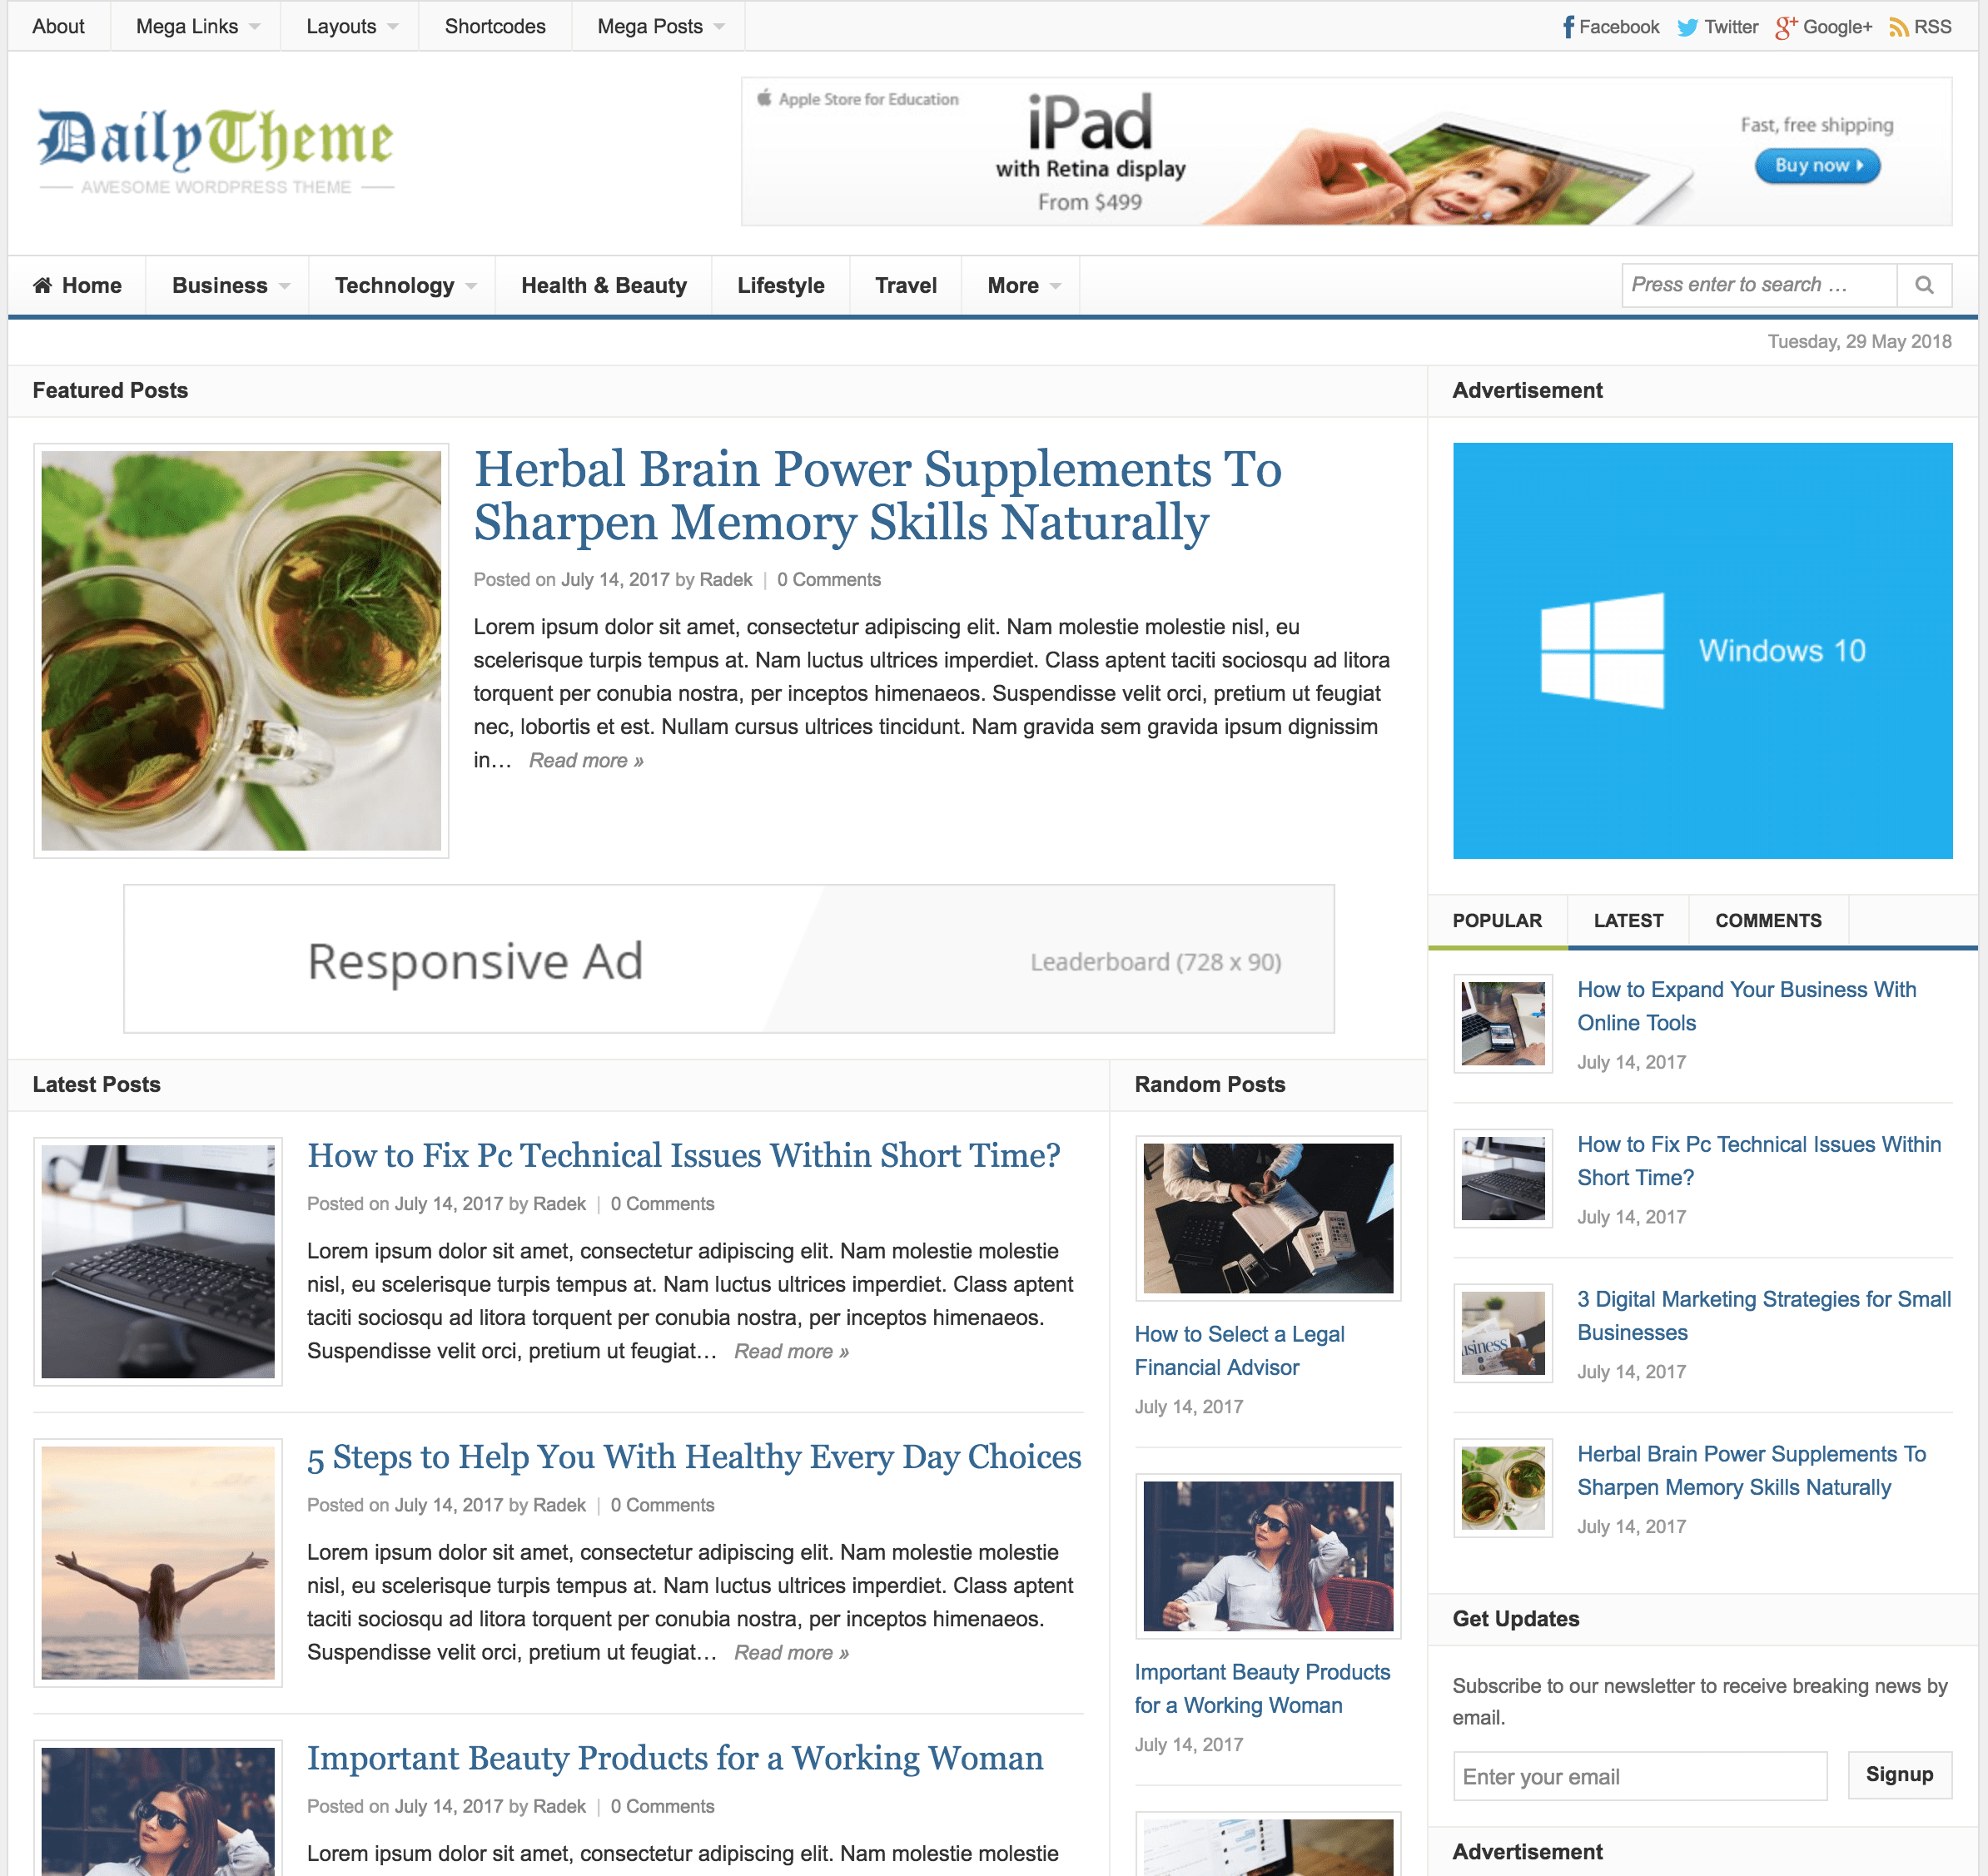
Here’s a quick list of our favorite WordPress themes for blogs and websites alike.
Please note, these are just personal favorites of DearBlogger, among a sea of many great themes you can use to create a WordPress blog. We cover how to setup a blog or website with each of these themes in a video on our YouTube channel.
Note: Some themes are linked by an affiliate link, thanks for your support!
Blogging
Simple Catch
Catch Base
Beginner
Laurel
Daily

Portfolio
Sydney
Fukasawa
Ocean WP


Events
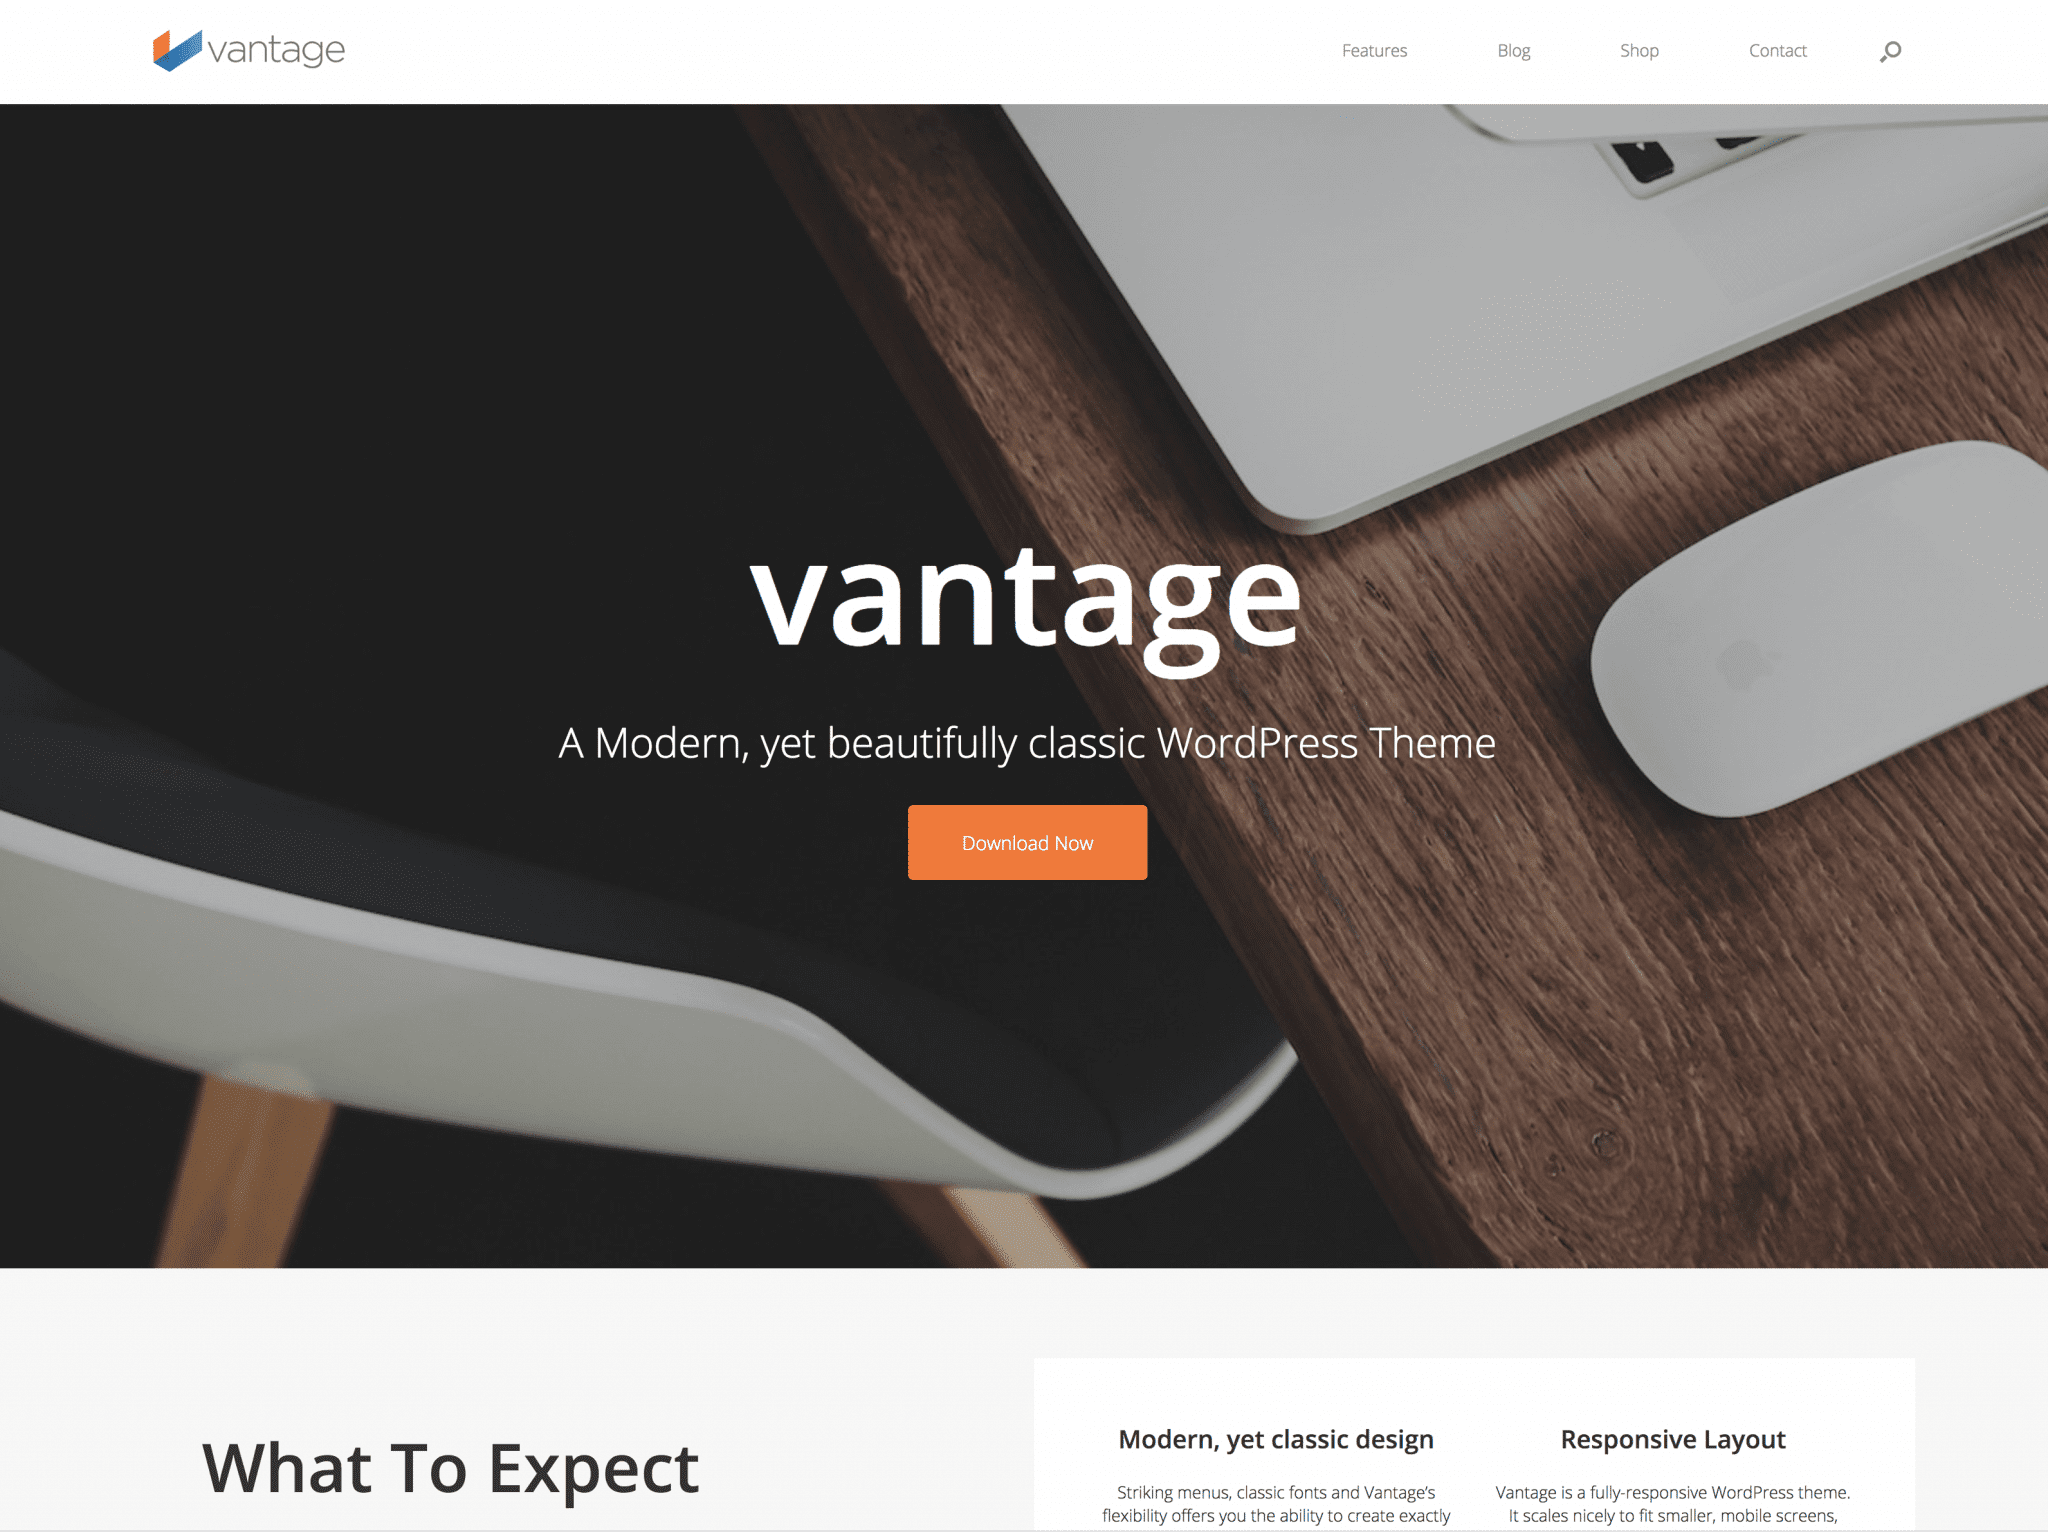
Vantage
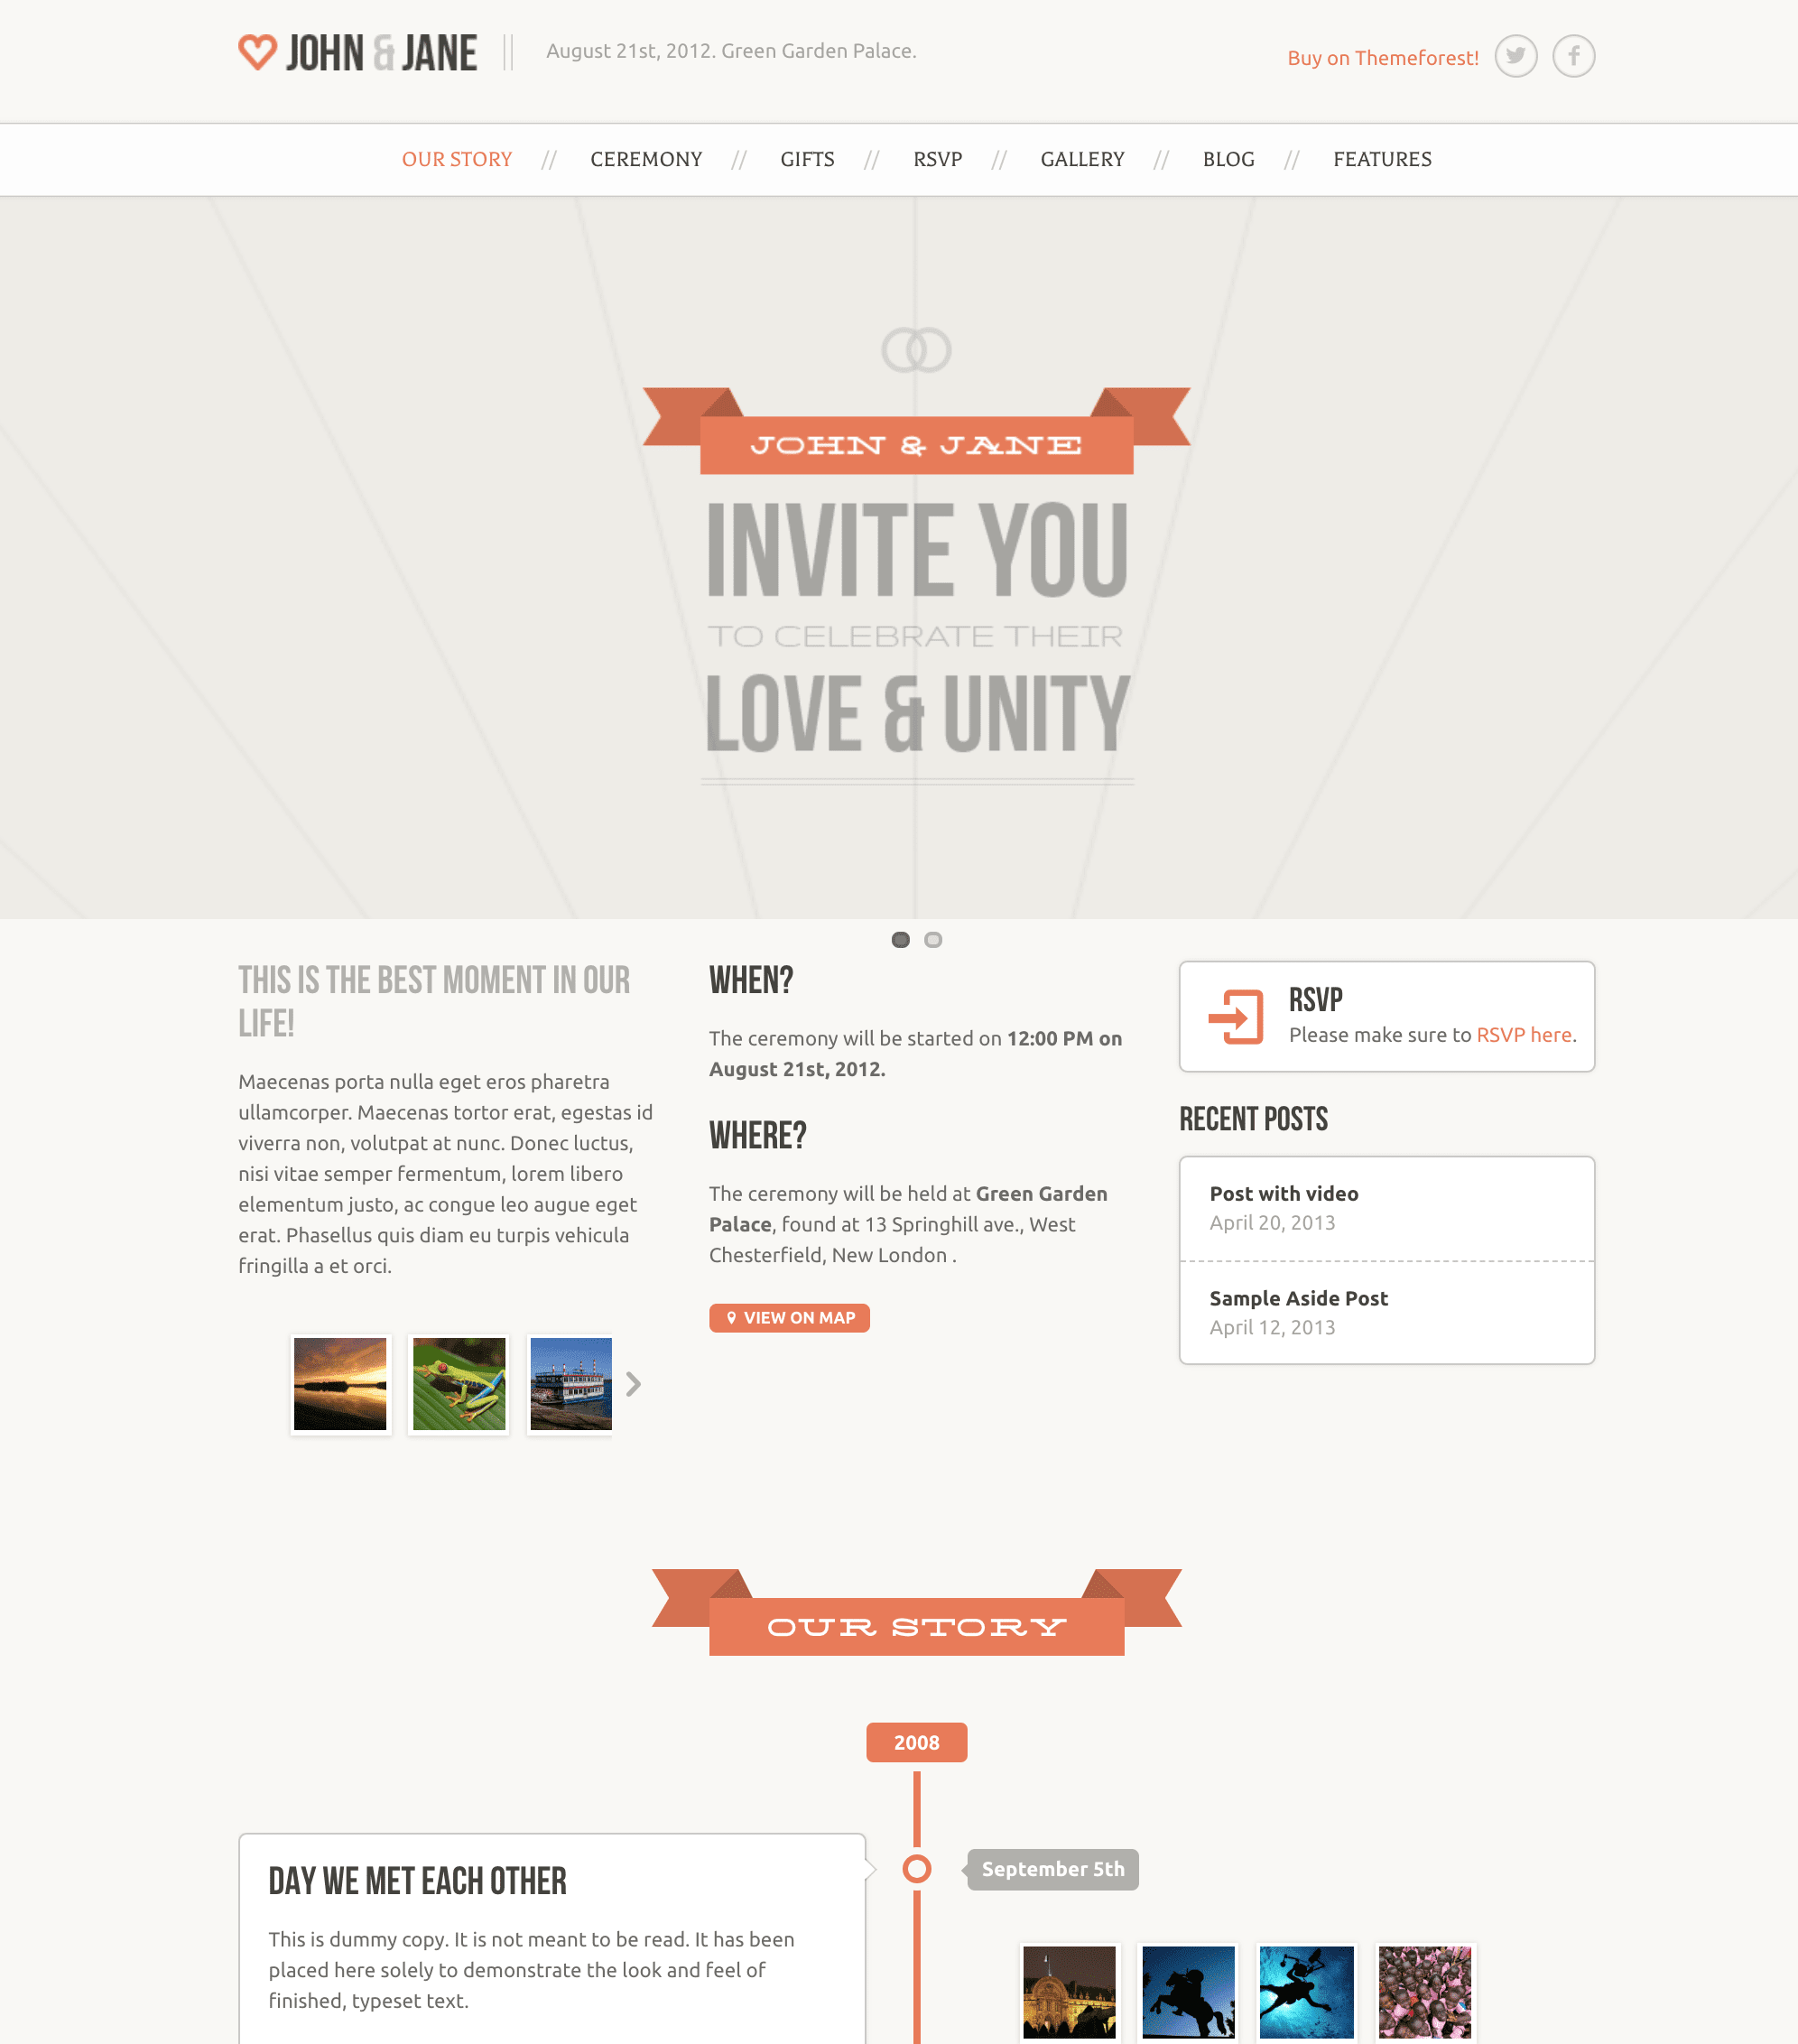
Wedding
Ocean WP

Business
Vantage
Sydney
Catch Business

eCommerce
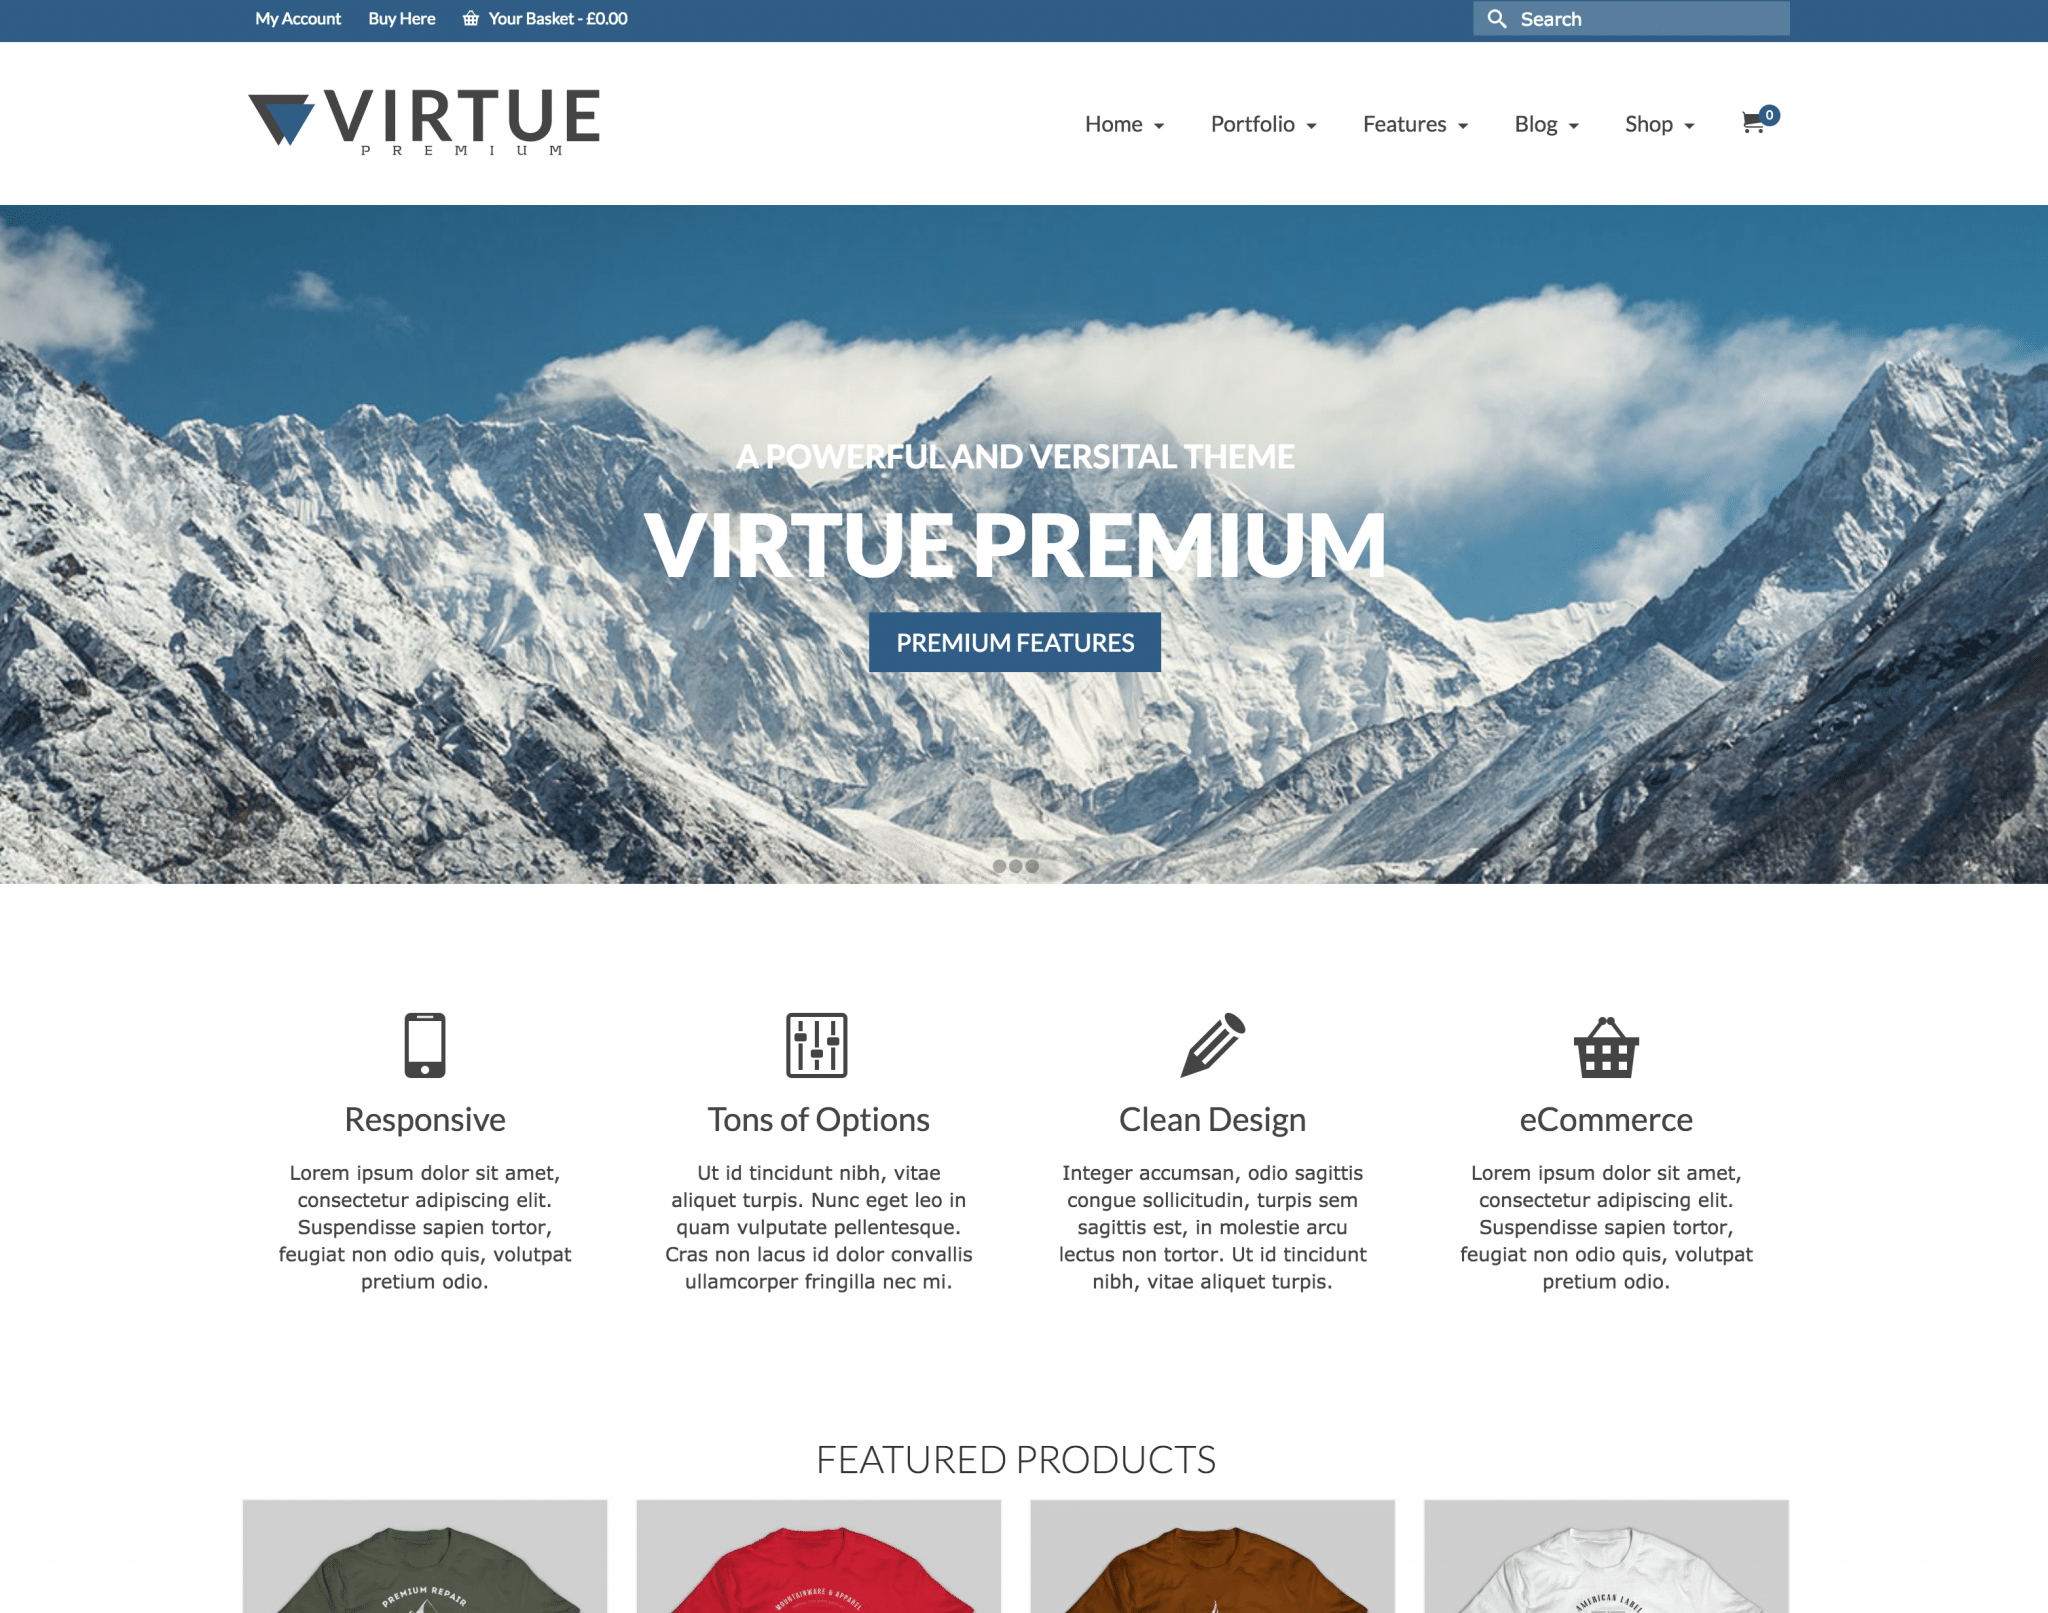
Virtue
Mr. Tailor
Flatsome

Each of these WordPress themes has great reviews and we’ve of course tested them. They will help you make your self hosted blog or website look professional quicker than most other themes. Let us know any questions down below!
How To Change Your Theme
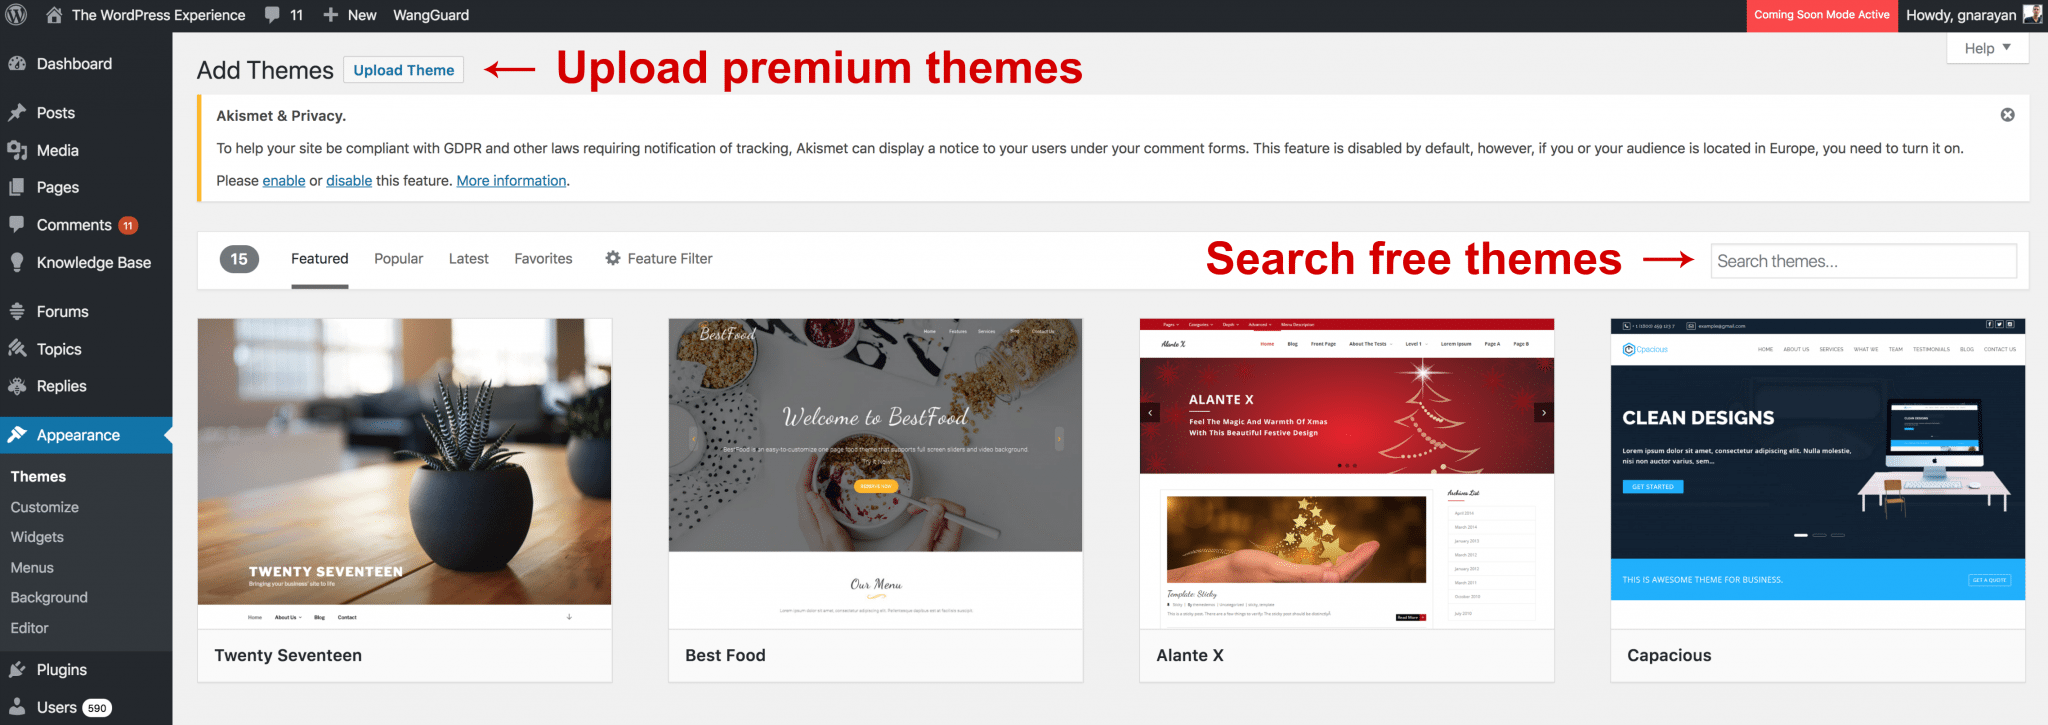
Changing your theme is a piece of cake. Hover on Appearance on the left, and click Themes. You will see the themes you already own here.
Click Add New at the top. On this screen you can either Search for free themes and install them right from within your WordPress dashboard, or you can click Upload Theme to upload a theme you purchased or downloaded. For example, if you want to install Vantage, just search for it inside WordPress. If you want to install Wedding, however, you’ll need to buy it, download it, them upload it to WordPress. When you upload a theme, you always upload the .zip file.

Sometimes you strike gold on your first them. But sometimes it can be tricky to find the right theme for your self hosted wordpress blog. You can also use tools like whatwpthemeisthat(dot)com to identify the theme a particular site you admire is wearing. We are happy to help you find the right theme, just ask!
How To Make a WordPress Blog – Full Video Tutorial
Would you rather watch this entire guide as a video? Reading long tutorials isn’t for everyone, we get it.
Our videos on YouTube help put WordPress into simple terms and make blogging and websites easier every day. This video we published has helped thousands of users setup self hosting and create a WordPress blog in just a year or so. If you didn’t like reading the steps above or are short on time, definitely check it out:
How to Add Blog Content to Your Self Hosted WordPress Blog for Free
You now have completely setup a WordPress self hosted blog, and you’ve got a blank canvas with the most powerful content management system in the world at your finger tips, right under the hood.
So, what will you make?
It’s a good idea to learn how to create a blog post, change the blog title, and add a plugin. Remember that our eBook guide over in the sidebar 10 Things To-Do Before Your New Blog Goes Live has tips on:
- Best WP plugins
- Best WP themes
- Steps to make your site fast
- How to rank in Google right away
- And even what blog posts to write.
Download your copy to learn all of this! It’s 100% free and is a great way to kick start your business and upload our past blogging knowledge to your brain quickly 🙂
But because there’s so many directions you could take your new WordPress blog, we’ve produced several beginner friendly video tutorials (check them out on our YouTube Channel here) each with a different theme and end result for you blog. We’ve helped thousands and thousands of bloggers and website owners setup sites, and would love to help you create free blog content too.
Remember, you can do anything with your new self hosted wp blog, don’t get stuck on a theme that doesn’t work or editing small details when you could be creating new content. You’re a pro now, so act like one 🙂 Enjoy!
Conclusion: Now You Know How To Create a WordPress Blog!
And as usual, thanks for using another Dear Blogger guide!
I hope you enjoy those first few moments browsing around your new self hosted wp blog. It’s a great feeling, one I compare to walking out of class on the first day of summer 🙂
Lastly, while I tried to be super exhaustive I know you still have some questions, so post those in the comments. Someone from the community is always handy to help out, and you’re guaranteed to learn something new.
As mentioned above we routinely update this post to be as complete of a self hosted WordPress guide for you as possible – so please let me know if you’d like anything added in!
If you want to learn more about designing your new self hosted WordPress blog and adding blog features, go here.
To create a professional business website out of it instead, go here.
On my YouTube channel you can find tons of free advice on WordPress design, SEO, monetization and more. I hope you can subscribe!
p.s. If you did find this guide helpful for you to create a WordPress blog or for any aspect of your business, it would be cool if you could hit share (Like, Tweet, whatever!) to help a few more readers learn WordPress blogging and setup a self hosted WordPress blog! Cheers and talk soon — Greg