
Dear Readers,
If you start an email list, the best way to promote it is simple:
Give a free eBook to new subscribers.
Sure, a newsletter is nice, but the eBook is the invite to the party and in reality most people want something quick and tangible.
So the way we do it is you create an eBook, then email each subscriber individually?
L.O.L. Maybe 20 years ago.
In this post, let’s do it the right way. Let’s deliver an eBook on auto pilot to new subscribers so we can do no work whatsoever in the moment.
Important Note: What you do during that no-work moment is totally up to you ;-]
What technology does this require?
As this is a tutorial post we will be using some resources you may or may not have already. Here’s the list of what we’ll need:
- Word processor – Open Office
- eBook cover maker – MyEcoverMaker
- Plugins – WordPress Hide Post
- Automated email marketing tool – Aweber
- CMS – WordPress
Substitutes: Microsoft Word, MailChimp, Adobe Photoshop, Google Docs Embedder, Blogger, Tumblr, Weebly, etc.
Prices: Aweber costs $1 for a 1 month trial. From what I’ve seen and heard, most folks sign up assuming they’ll back out. Those who start collecting subscribers stick around while those with less success leave.
Lazy workaround: There are workarounds, but from personal experience it’s fun automating process, it’s what many large blogs do (see ProBlogger, Daily Blog Tips) and subscribers often appreciate being dazzled by the process!
The need to deliver the Bounce Rate eBook is what finally got me going with an email marketing tool. I highly recommend starting! You can use an email marketing too for lots of functions, you’ll stop needing weird plugins and other freebies, and you’ll start understanding the email marketing buzzwords all these people on the web are talking about!
First off, let’s touch on a few best practices. If you’re already good on these then just skip ahead to Step 1…
How do I write my eBook? Best practices here
As linked above, our guide on writing eBooks was published a while back, right here. This is where you’d use the word processor, the cover maker and your one of a kind creativity. However, a few points are worth mentioning again:
1…Use a niche-narrow topic
Writing on a broad and general topic is great because you don’t miss anyone, but the problem is that you might not grab anyone either!
Nowadays you just have to be more specific because the vague topics are all covered.
Consider these eBook titles: How to Get More Clicks vs. How I Got 400% More Clicks by Restructuring my Blog Post Content.
Which one would you download?
Now consider these: How to Have Fun in Fiji vs. 10 Rare Finds in Fiji that Will Change Your Life.
Which one is written by the clear expert?
More specific topics that incorporate numbers have been proven to convert better. Only the big boys of eBooks like Darren Rowse can get away with being vague, and even then…
2…Reference past experience in an obvious manner
“Where’s the proof?” is the first thing people will ask after they see any pitch, before they even wonder about the price.
Make sure your title and landing pages “prove it” quickly and you’ll see more engagement.
For example, our landing page here includes one side-by-side image from analytics that says a lot without much thought on the reader’s part.
3…Always triple-check images and links
Would you click a sloppy link or read through misaligned images?
If you’ve got a great design and links are strategically set up to send referral traffic, the worst thing that can happen is to have things look messy.
Your best bet is to keep things simple. You might even want to download some eBooks from a few different sites to see what’s been working over the years for others.
4…If all else fails, help readers DO something
Lastly, before you load your eBook for delivery, make sure it will almost instantly help people do something in their lives or careers. This is your value proposition. This is what will make people want your eBook and drive them to subscribe to your website (and ergo, your email list).
If your eBook definitively helps people DO then all the worrisome details of formatting and style can melt away.
Harness this drive through persuasive copy and your ebook will perform much better than the more general PDFs scattered about the web.
With all that in mind – and hopefully you arrived at this post with an eBook all ready – let’s get down to business!
Step 1: Setup your delivery landing page
First step is simple: create a new blog post or page.
We’ll be uploading the eBook to this post or page, so pick whichever format (post or page) will be best. Write some copy on this page like “Click here to download the eBook”.
Then upload the .pdf file of your eBook into your Media tab. It won’t take up much more space than an image.
Now link .pdf file to that text you just wrote out.
This effectively creates a “download” someone can use right from your blog, without any plugins or other file hosting tools.
Simple is best.
In other words, that simple link is the only text this page really needs.
But, you’d be wise to put a thank-you on this page, too, as well as some “next steps” to upsell the reader on your further content.
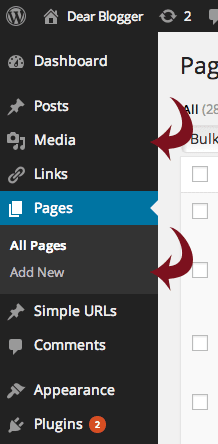
Step 2: Hide the landing page from everyone
Now, it’s time to get crafty. We don’t want anyone but a new subscriber landing on this landing page 🙂
Download the WP Hide Post plugin and activate it, if you haven’t already done so.
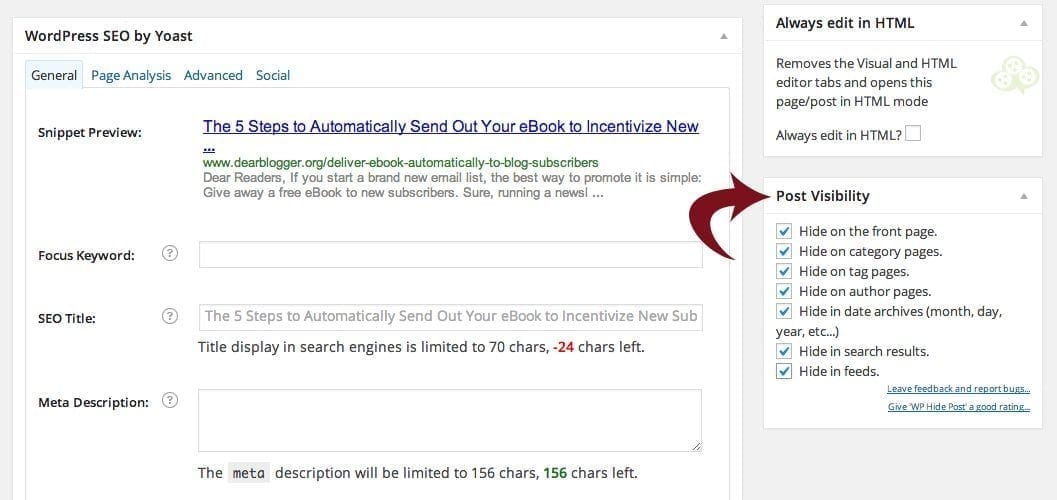
All you really have to do here is check the box for where you don’t want this page to appear, then publish the page (or post).
Delivery landing page is ready!
Important: Remember to hide this page from the search engines too, so that if a curious reader Google’s “your blog + eBook,” they won’t be able to snoop around. To do this, just click that second to last box in your new Hide Post plugin.
Step 3: Create an automated response “follow-up” email
Now it’s time to head over to our email marketing software. Note: this tutorial assumes you’ve got an account with Aweber, but these steps will work just fine elsewhere, too, minus the video walk-throughs below I’ve custom made for you. 🙂
Remember, our goal is to do zero work here. We want the email to go out to the new subscriber while we’re sleeping (or simply not around).
Less work, less delays, more subscribers.
Doubly remember this! If the new subscriber does not get the intended email, or gets an errant message, they’ll probably send negative feedback to you, or dis your blog in a forum or on Twitter. Even if you are online, it’ll be hard to monitor this. Therefore it’s important to trust your email subscriber and this whole process to a tool that you know actually works.
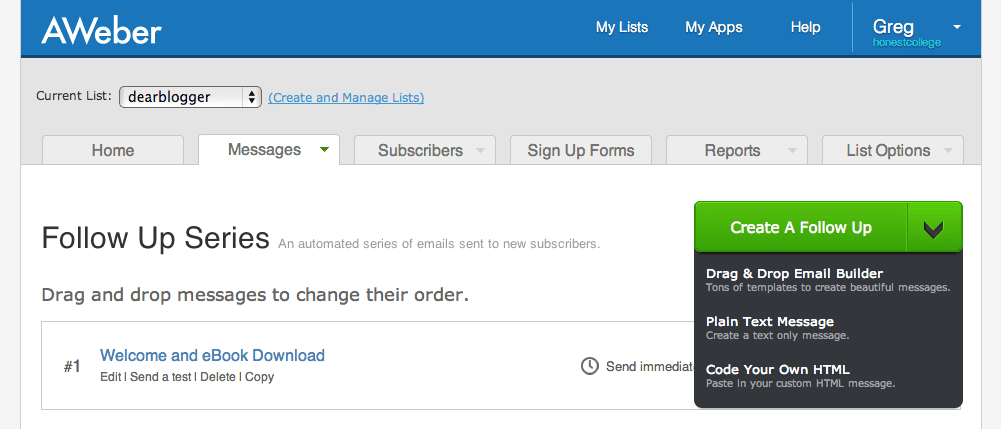
The steps to create the necessary “follow-up” are fairly straightforward:
- Create a new message in plain text format.
- Within the message, place a link to the page you’ve hidden.
- Hit Save.
- By default, because Aweber is a tool used for follow up emails, the first message you create is automatically sent to new subscribers. You could always turn this off or delay it, but in this case we obviously want this message going out right away.
Again, the initial follow-up must include: a clear link back to your blog’s landing page, some thank-you copy, and a heads up if you’ll be sending out a newsletter later on.
Good to be polite, as this helps subscriber retention.
In the future, you can create subsequent messages (like a newsletter) and time them to go out at intervals following this message.
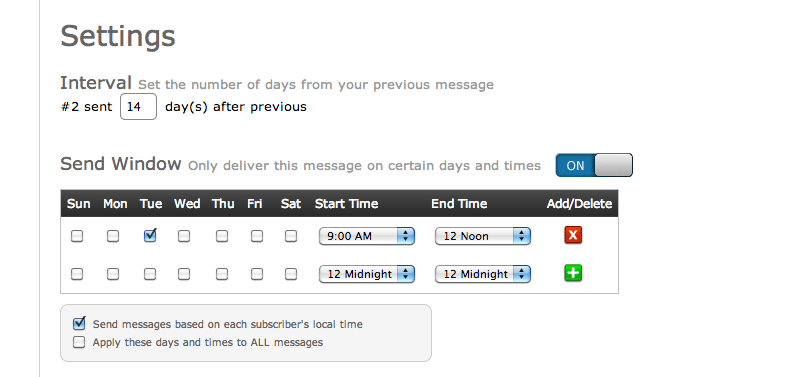
The follow-up system is pretty slick.
I’m honestly not entirely sure what other softwares offer, but with Aweber the way it works is 1. someone signs up through your forms 2. then get a confirmation email with just a link 3. they confirm by clicking this link then 4. right away they get your follow-up containing a link to the eBook delivery landing page then 5. they get any more messages you’ve created at specific times you set in advance.
It’s a classy way to say thanks and then send more rich content.
But that reminds me, before anyone can join, in we’ll need to…
Step 4: Create and install a sign-up form
Time to have some fun.
And more importantly, time to let your readers have some fun with a chance to get involved in what you’ve just cooked up.
We’ll need sign-up forms pasted around your blog and, depending on how your blog looks, you made need to spend some time styling.
Most of us have seen the basic forms from Feedburner and other widgets, but get ready to be blown away.
It costs a dollar to try Aweber, but if even that’s too much, here’s how it looks on the inside:
Next up, install the form.
This part is really easy.
You literally just copy and paste a piece of JavaScript code into your blog posts or into a simple text widget and the form will appear wherever you’d like.
Aweber makes this code for you, but you can still say you’ve worked with JavaScript . 😉
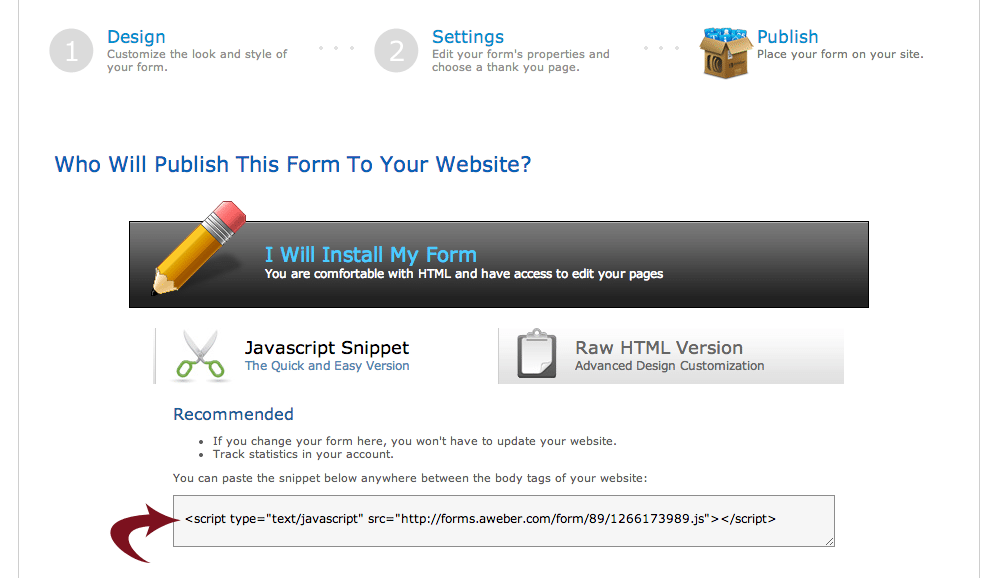
Again, you just have to insert a form once. Any changes you make on the Aweber design end will be automatically reflected at your blog once you hit Save.
Step 5: Make more forms (optional but smart these days)
Social Triggers tells us that more forms equates to more subscribers.
Fortunately, we can make as many sign-up forms as we want and paste them all over our websites! After a while, take a look at which ones are performing the best:
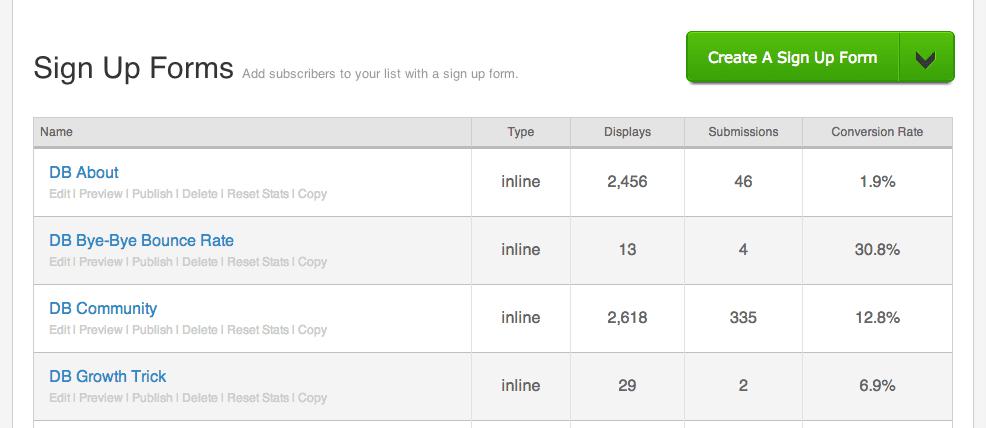
Example analysis: 335 sign ups on the community page ain’t bad…butttt maybe we could get that conversion rate up if we tweaked the copy. Always be tweaking.
The idea here is to play around and try out some split testing, A/B testing, and anything else you feel is productive.
Step 6: Promote your eBook/list
Your eBook won’t just sell itself, so it’s time to create what I think is among blogging most important assets, social proof.
Start mentioning the list in your sidebar, in your posts and in the footer sections of places you’re allowed to guest post.
You could create a subscriber funnel like Blog Tyrant recommends or ask for some beta reviews from folks in your close circles.
Before you go! I almost forgot…
…I made a step by step video on this process a while back when I was more into video. It walks you through making the delivery landing page and covers every element of coding (not much required really) in about 6 minutes.
Hate to say it, but you now have no excuses. 🙂
Ahh, finally done.
With this all in place, someone can subscribe to your blog and get your PDF eBook delivered right away with you doing zero work at all (other than the initial set-up).
They can then read your eBook while having a coffee, take hold of your tactics, and when you start seeing reviews come in and maybe the occasional affiliate sale you just might understand the glory of automation.
So what’s holding you back?
Despite how it all looks now, I waited to build my email list. For two years.
I just didn’t believe it mattered and was a cost-cutter at heart.
Reality: The longer you wait, the harder it becomes. Your subscribers-to-be join other lists or get jaded by the whole process and find other sources of entertainment when they should be all about your content.
So what’s holding you back? Conversely, how are you reaping the benefits?
If you enjoyed this one, why not drop a comment and tell us. Thanks.


Appreciating the hard work you put into your website and in depth information you offer.
It’s good to come across a blog every once in a while that isn’t the same unwanted
rehashed material. Fantastic read! I’ve bookmarked your site and I’m including your RSS feeds to
my Google account.
Nice article. How can I use Mailchimp to achieve this?
Thank you for that information Greg. Its helped me allot. Much appreciated.
Hay
This Post is very helpful for me. I have setup all things and make my own e-book club.
Thankyou so much.
Hi, this is a great post and I was following it until I realised it’s for self hosted blogs. Mine is not (yet – I’m beginning to see the merits of SH though). Do you have any tips for giving something away to new followers on a wordpress hosted blog? I’ve been trying for over a week to sort this out, but keep on failing, so any suggestions would be great.
thanks Jane! yeah self-hosting is a whole new world, it’s awesome. you just have to get that Aweber or MailChimp code into your blog…in a post or page, or sidebar. i just did some Googling and everything came up that i’ve seen already, for wordpress.org.
MailChimp must have a free option though…or, you could ask a woman named Lorraine from wordingwell.com, I think she has done this successfully. let me know how it goes and any more questions you have.
I already have an e-book and email subscription but I recommended this article to some people I know that can really benefit from reading it.
Thanks Gary! Nice, what’s your eBook cover?
Hi thank you very much for this i have been thinking about doing an e book for sometime now , and you have made it simple by laying everything out.
Thanks Once again !!!
You’re very welcome Brian! Don’t let anything hold you back, it’s your ticket to being seen as a niche expert!
I despair at all I should be doing — I know, I know, despairing is a total waste of time and energy 😉
Don’t worry Suzanne, there’s always tomorrow, or the next day…. 😉
Excellent how to guide. I actually just set an ebook up for my subscribers using mailchimp a few weeks ago.
How did you do it, Jason. I want to set one up with Mailchimp, too. I don’t have a credit card, so I cannot get Aweber or GetResponse, either. I am considering getting EmailAces or Contactology for my site. I have an ebook already! Any suggestions?
Grabbed your business book Jason, thanks!
Jason I see the call-to-action “Free eBook when you subscribe!” but I am missing the reason-Why ? You don’t even tell what to expect in your ebook.
Thanks so much for this, it is getting bookmarked. Now all I have to do is actually write an ebook! 🙂
You’re very welcome Christine! What’s holding you back?
You have laid the whole process out nicely. No excuses for not getting started.
That’s the spirit Beth. Let me know how it all goes for you!
This came at a perfect time for me – as you know – because I just created a new website and want to do exactly this. Thanks, Greg! 🙂
For once timing is my thing 🙂 Oh boy the new website is looking good. Do you have…two logos?!
Yes, I do, actually. Well, three if you consider the image of the well! I am considering switching the black-background one for the other one, as I like it better. 🙂 Which is your favourite? The one in my sidebar?
That’s a tough one because I’m notoriously bad with logos. The header is my fav with the keyboard because it’s just so you.
What does EVERYONE ELSE think of Lorraine’s logo selections?
N’ what’s that graphic in the sidebar logo?
I’m working on a ebook that was recommended my mastermind group when we were doing a review of my blog. I know that it works, but hadn’t put it together. The funny part is I know how, so it’s time to get to it… huh. 🙂
Like, before you write your next post time. Before your next glass, time 🙂 Coolest thing is the newsletter authority you build after a good eBook delivery. What’s the eBook all about? (always prying with my questions lol)
I have been thinking about the e-book/email subscription thing for a while now, and was just overwhelmed by the process. Thanks for breaking it down. You’re right, now I have no excuse. 🙂
Same here. I mean, with you new design and pretty darn evident social proof I think you blog is begging for this 🙂
Need:
– Landing page
– Gift (like an eBook)
– Delivery service (as per above)
– Optional: some testimonials. Do you have any from all your design/consulting clients?
Then the system flows as your traffic comes in…